Connect Google Cloud AlloyDB so AI agents can search your vector tables and answer counting and totals questions from your regular tables.
Connect a Google Cloud AlloyDB database to Raily and choose the tables you want agents to use. Raily reads your tables where they are. It does not copy your data, re-embed your vectors, or change your database.
AlloyDB is available on request. Contact us to turn it on for your Account.
Before you start
A database user Raily can log in with. Use a dedicated read-only user, not a database owner. It needs SELECT on the tables you want and USAGE on their schemas. Raily shows the commands to set this up during the connection (see step 3).
Public IP enabled on your AlloyDB instance. Instances with private IP only can’t be connected. Raily connects through Google’s authenticated connector, which verifies the server and encrypts the connection, so you don’t need to deploy a proxy or allowlist IP addresses. See Google’s guide to enabling public IP.
Two Google Cloud roles for Raily’s service account in the project that holds your instance: AlloyDB Client and Service Usage Consumer. These let Raily open a connection. They don’t give access to your tables.
For vector tables: each vector column must declare a fixed size (for example vector(768)), all vector columns in a table must have the same size, and the table needs an id column or a single-column primary key. You also need to know which embedding model and version created the vectors.
Steps
In the sidebar, open Search Rail and click Connect source. Then click the Google Cloud AlloyDB card.The form has three stages: Connect, Choose tables, and Review.
1
Name the Source
Enter a Name for this connection.
2
Enter the connection details
Instance resource name: the full resource name of your instance, in the form projects/PROJECT_ID/locations/REGION/clusters/CLUSTER_ID/instances/INSTANCE_ID. Use the resource name, not the IP address. Open Find your instance URI under the field if you need help finding it.
Database name: the database that holds your tables (not the cluster name).
Database username: defaults to raily_reader. Change it if your read-only user has a different name.
Database password: the password of that database user, not your Google account password.
If you already have a connection string, click Paste a connection string instead. It must use the form postgresql://USER@alloydb/DATABASE?instance_uri=projects/.... Keep @alloydb as shown and leave the password out of the string. Enter it in Database password.
3
Grant access (first connection only)
If you haven’t set up access yet, open Set up access for a first connection. It shows commands filled in with your details, each with a copy button:
Google Cloud connection permissions: the Raily service account for your Account and two gcloud commands that grant it AlloyDB Client and Service Usage Consumer. Run them as someone who can update the project’s IAM policy. Don’t grant Owner or Editor.
Database read permissions: a GRANT pg_read_all_data command for your database user. This grants read access to every database in the cluster that the user can connect to. If you want to limit Raily to specific tables, skip it and use a user that already has SELECT on only those tables.
Two optional sections cover a database that restricts who can connect (Allow connection to a restricted database) and creating a new read-only user (Create a database user if you need one).Already have a user that can read your tables? Skip this step.
4
Test the connection
Click Test connection & load tables. When the test passes, click Continue to tables.
5
Choose tables
Raily lists every table and view the database user can read, grouped by schema. Select the ones you want.
Tables with vectors need an embedding model. Pick the same model and version that created the table’s vectors. Models with a different vector size are disabled, but a matching size alone is not enough: it has to be the same model.
Regular tables show Table analytics. No embedding model needed.
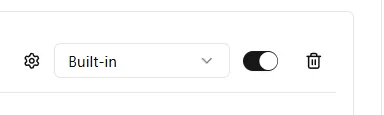
Don’t have one yet? Open the embedding config picker and click Create New.
Create a new embedding config
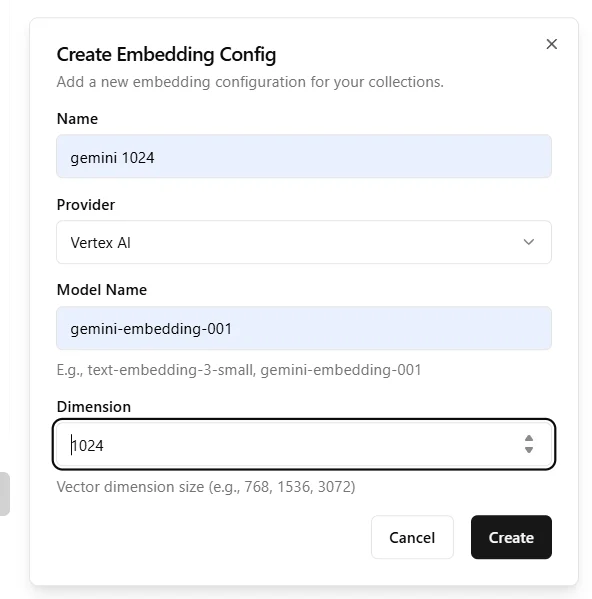
Enter a Name, pick a Provider, and set the Model Name and Dimension to match the model that created your vectors. Add an API Key if the provider needs one, then save.
Embedding config form
If you selected any vector table, tick the box confirming that the model, version, and dimensions match each table’s existing embeddings. Then click Continue to review.
6
Review and connect
Check the instance, database, database user, and each table. Vector tables show Semantic search and analytics with the model you picked. Regular tables show Analytics only.Click Connect & generate configuration. Raily sets up search for each table automatically. Your database is not changed.
7
Create an endpoint
When the search configuration is ready, the Source page shows Finish setup: create endpoint. Click it, confirm a name and sign-in, and create the endpoint your agents will connect to.
When setup is done, the Source page shows which endpoints search it (Searched by). Ask a question in Test your endpoint to check the answers.New tables you add to AlloyDB later are not picked up automatically. To add one, edit the Source, click Test connection & load tables again, and select it.
Content tables and data tables
Raily looks at your database catalog and decides what each table can do. You don’t set this yourself.Tables with vectors hold content: articles, documents, products, support tickets. Agents use them to find rows by meaning, and they can also count and total those rows. Example questions:
“What have we published about electric car subsidies?”
“Find support tickets where customers complain about late delivery.”
“How many articles about Switzerland were published in 2025, and show me a few.”
Regular tables (no vector column) hold records you want to measure: orders, events, sign-ups. Agents use them for counts, sums, averages, minimums, maximums, and earliest or latest dates, optionally grouped by a column or by day, week, month, or year. Example questions:
“How many orders were placed in March 2026?”
“What was the total revenue per region last year?”
“What’s the average delivery time by month in 2025?”
A few things to know about table answers:
Raily computes calendar periods itself. When a question names a whole year, month, or day (“in March 2026”), Raily works out the start and end dates, so the count covers the full period. Periods and date groupings use UTC.
One table per answer. Raily doesn’t join tables. A question that needs data from two tables gets a separate answer from each, never a combined total.
One measure per question. Ask “how many orders” and “what was the total revenue” as two questions.
Grouped answers are capped. Raily returns up to 20 groups and says when more exist.
Counting distinct values and ranking are not supported. For example, “how many different customers ordered” or “top 5 products by sales”.
Regular tables can’t answer “find me” questions. They have no vectors to search by meaning. Ask them for a count or a total instead.
Next steps
Create an AI endpoint
Let agents search this source
Data Catalog
Review the fields agents filter on
{"docsConfig":{"theme":"mint","$schema":"https://mintlify.com/docs.json","name":"Raily","colors":{"primary":"#4F46E5","light":"#6366F1","dark":"#4338CA"},"logo":{"light":"https://mintcdn.com/railyai/xbbAvRXwh2aN81tn/logo/light.svg?fit=max\u0026auto=format\u0026n=xbbAvRXwh2aN81tn\u0026q=85\u0026s=c95fa56069c37e1e973e88d9b7d21bc5","dark":"https://mintcdn.com/railyai/xbbAvRXwh2aN81tn/logo/dark.svg?fit=max\u0026auto=format\u0026n=xbbAvRXwh2aN81tn\u0026q=85\u0026s=6c902701fcec677c4afd1e92ed2715f7"},"favicon":"https://mintcdn.com/railyai/xbbAvRXwh2aN81tn/favicon.svg?fit=max\u0026auto=format\u0026n=xbbAvRXwh2aN81tn\u0026q=85\u0026s=1c631b1c813fa8e75bd7de7bc12d2b7c","navbar":{"links":[{"href":"https://www.raily.ai/contact","label":"Support"}],"primary":{"type":"button","label":"Get Started","href":"https://raily.ai/contact"}},"footer":{"socials":{"linkedin":"https://linkedin.com/company/raily-ai","website":"https://raily.ai"}},"styling":{"latex":false},"navigation":{"pages":[]}},"deployment":{"deploymentMetadataValue":{"subdomain":"railyai","hasAudioNarration":false,"actualSubdomain":"railyai","customDomains":["docs.raily.ai"],"gitSource":{"type":"github","owner":"raily-ai","repo":"docs","deployBranch":"main","contentDirectory":"","isPrivate":true,"mountPath":"","label":""},"entitlements":{},"buildId":"6ae725a5c064cc679ecf5bd6","clientVersion":"0.0.4263","searchFilterCounts":[{"language":"default","tag":"Documentation","count":36},{"language":"default","tag":"Integrations","count":14},{"language":"default","tag":"Features","count":8},{"language":"default","tag":"Content sources","count":5},{"language":"default","tag":"Core Concepts","count":4},{"language":"default","tag":"Connect Data to AI","count":4},{"language":"default","tag":"Getting Started","count":3},{"language":"default","tag":"Storage","count":3},{"language":"default","tag":"SDKs","count":3},{"language":"default","tag":"Databases","count":1}]},"assistantConfig":{"enableAskAiButton":false,"enableStarterQuestions":false,"enableAskAiSearchBar":true},"basePath":"","hasChatPermissions":false,"hasWebMcpPermissions":false,"toggles":[{"name":"kill-isr","enabled":true,"variant":{"name":"disabled","enabled":false,"feature_enabled":true},"impressionData":false},{"name":"custom-rbac-roles","enabled":true,"variant":{"name":"disabled","enabled":false,"feature_enabled":true},"impressionData":false},{"name":"agent-mintlify-slack","enabled":true,"variant":{"name":"disabled","enabled":false,"feature_enabled":true},"impressionData":false},{"name":"agent-integrations-settings","enabled":true,"variant":{"name":"disabled","enabled":false,"feature_enabled":true},"impressionData":false},{"name":"rbac-expansion","enabled":true,"variant":{"name":"disabled","enabled":false,"feature_enabled":true},"impressionData":false},{"name":"automations-pr-grouping","enabled":true,"variant":{"name":"disabled","enabled":false,"feature_enabled":true},"impressionData":false},{"name":"custom-prefix","enabled":true,"variant":{"name":"disabled","enabled":false,"feature_enabled":true},"impressionData":false},{"name":"analytics-v7","enabled":true,"variant":{"name":"disabled","enabled":false,"feature_enabled":true},"impressionData":false},{"name":"user-flows-analytics","enabled":true,"variant":{"name":"disabled","enabled":false,"feature_enabled":true},"impressionData":false},{"name":"no-publish-flow","enabled":true,"variant":{"name":"disabled","enabled":false,"feature_enabled":true},"impressionData":false},{"name":"workos-onboarding","enabled":true,"variant":{"name":"disabled","enabled":false,"feature_enabled":true},"impressionData":false},{"name":"snapshot-serving-live","enabled":true,"variant":{"name":"disabled","enabled":false,"feature_enabled":true},"impressionData":false},{"name":"stripTemperatureMiddleware","enabled":true,"variant":{"name":"disabled","enabled":false,"feature_enabled":true},"impressionData":false},{"name":"support-platform-pylon-zendesk","enabled":true,"variant":{"name":"disabled","enabled":false,"feature_enabled":true},"impressionData":false},{"name":"snapshot-serving","enabled":true,"variant":{"name":"disabled","enabled":false,"feature_enabled":true},"impressionData":false},{"name":"instant-rollback","enabled":true,"variant":{"name":"disabled","enabled":false,"feature_enabled":true},"impressionData":false},{"name":"granular-notifications-server","enabled":true,"variant":{"name":"disabled","enabled":false,"feature_enabled":true},"impressionData":false},{"name":"granular-notifications","enabled":true,"variant":{"name":"disabled","enabled":false,"feature_enabled":true},"impressionData":false},{"name":"automations-fable","enabled":true,"variant":{"name":"disabled","enabled":false,"feature_enabled":true},"impressionData":false},{"name":"fixed-ai-action-pricing","enabled":true,"variant":{"name":"disabled","enabled":false,"feature_enabled":true},"impressionData":false},{"name":"site-roles","enabled":true,"variant":{"name":"disabled","enabled":false,"feature_enabled":true},"impressionData":false},{"name":"automation-resolve-merge-conflict","enabled":true,"variant":{"name":"disabled","enabled":false,"feature_enabled":true},"impressionData":false},{"name":"scoped-publishing","enabled":true,"variant":{"name":"disabled","enabled":false,"feature_enabled":true},"impressionData":false},{"name":"mintql","enabled":true,"variant":{"name":"disabled","enabled":false,"feature_enabled":true},"impressionData":false},{"name":"page-level-analytics","enabled":true,"variant":{"name":"disabled","enabled":false,"feature_enabled":true},"impressionData":false},{"name":"editor-version-history-v2","enabled":true,"variant":{"name":"disabled","enabled":false,"feature_enabled":true},"impressionData":false},{"name":"billing-page-v2","enabled":true,"variant":{"name":"disabled","enabled":false,"feature_enabled":true},"impressionData":false},{"name":"full-page-search","enabled":true,"variant":{"name":"disabled","enabled":false,"feature_enabled":true},"impressionData":false},{"name":"workspace-projects","enabled":true,"variant":{"name":"disabled","enabled":false,"feature_enabled":true},"impressionData":false},{"name":"assistant-v5","enabled":true,"variant":{"name":"disabled","enabled":false,"feature_enabled":true},"impressionData":false},{"name":"fork-pr-previews","enabled":true,"variant":{"name":"disabled","enabled":false,"feature_enabled":true},"impressionData":false},{"name":"revalidation-jwt","enabled":true,"variant":{"name":"disabled","enabled":false,"feature_enabled":true},"impressionData":false},{"name":"workos-sso-scim","enabled":true,"variant":{"name":"disabled","enabled":false,"feature_enabled":true},"impressionData":false},{"name":"hobby-abuse-scan","enabled":true,"variant":{"name":"disabled","enabled":false,"feature_enabled":true},"impressionData":false},{"name":"dashboard-inbox","enabled":true,"variant":{"name":"disabled","enabled":false,"feature_enabled":true},"impressionData":false},{"name":"workos-signup","enabled":true,"variant":{"name":"disabled","enabled":false,"feature_enabled":true},"impressionData":false},{"name":"turbopuffer-dual-write","enabled":true,"variant":{"name":"disabled","enabled":false,"feature_enabled":true},"impressionData":false},{"name":"workos-enabled","enabled":true,"variant":{"name":"disabled","enabled":false,"feature_enabled":true},"impressionData":false},{"name":"approve-review-flow","enabled":true,"variant":{"name":"disabled","enabled":false,"feature_enabled":true},"impressionData":false},{"name":"editor-metadata","enabled":true,"variant":{"name":"disabled","enabled":false,"feature_enabled":true},"impressionData":false},{"name":"sso-setup-deadline-banner","enabled":true,"variant":{"name":"disabled","enabled":false,"feature_enabled":true},"impressionData":false},{"name":"turbopuffer-serve","enabled":true,"variant":{"name":"disabled","enabled":false,"feature_enabled":true},"impressionData":false},{"name":"live-agents","enabled":true,"variant":{"name":"disabled","enabled":false,"feature_enabled":true},"impressionData":false},{"name":"starter-pricing","enabled":true,"variant":{"name":"control","enabled":true,"payload":{"type":"string","value":"control"},"feature_enabled":true},"impressionData":false},{"name":"llms-txt-v2","enabled":true,"variant":{"name":"disabled","enabled":false,"feature_enabled":true},"impressionData":false},{"name":"wildcard-email-auth","enabled":true,"variant":{"name":"disabled","enabled":false,"feature_enabled":true},"impressionData":false}],"googleFontsInlined":false},"customCss":[]}
{"page":{"pagePath":"integrations/databases/alloydb","slug":"/integrations/databases/alloydb","pageMetadata":{"title":"Connect AlloyDB","sidebarTitle":"AlloyDB","description":"Connect Google Cloud AlloyDB so AI agents can search your vector tables and answer counting and totals questions from your regular tables.","href":"/integrations/databases/alloydb"},"description":{"compiledSource":"\"use strict\";\nconst {jsx: _jsx} = arguments[0];\nconst {useMDXComponents: _provideComponents} = arguments[0];\nfunction _createMdxContent(props) {\n const _components = {\n p: \"p\",\n ..._provideComponents(),\n ...props.components\n };\n return _jsx(_components.p, {\n children: \"Connect Google Cloud AlloyDB so AI agents can search your vector tables and answer counting and totals questions from your regular tables.\"\n });\n}\nfunction MDXContent(props = {}) {\n const {wrapper: MDXLayout} = {\n ..._provideComponents(),\n ...props.components\n };\n return MDXLayout ? _jsx(MDXLayout, {\n ...props,\n children: _jsx(_createMdxContent, {\n ...props\n })\n }) : _createMdxContent(props);\n}\nreturn {\n default: MDXContent\n};\n","frontmatter":{},"scope":{}},"pageType":"default","mdx":{"mdxSource":{"compiledSource":"\"use strict\";const{Fragment:_Fragment,jsx:_jsx,jsxs:_jsxs}=arguments[0];const{useMDXComponents:_provideComponents}=arguments[0];function _createMdxContent(props){const _components={a:`a`,code:`code`,li:`li`,ol:`ol`,p:`p`,strong:`strong`,ul:`ul`,..._provideComponents(),...props.components},{Card,CardGroup,Frame,Heading,Note,OptimizedImage,Step,Steps}=_components;if(!Card)_missingMdxReference(`Card`,true);if(!CardGroup)_missingMdxReference(`CardGroup`,true);if(!Frame)_missingMdxReference(`Frame`,true);if(!Heading)_missingMdxReference(`Heading`,true);if(!Note)_missingMdxReference(`Note`,true);if(!OptimizedImage)_missingMdxReference(`OptimizedImage`,true);if(!Step)_missingMdxReference(`Step`,true);if(!Steps)_missingMdxReference(`Steps`,true);return _jsxs(_Fragment,{children:[_jsx(_components.p,{children:`Connect a Google Cloud AlloyDB database to Raily and choose the tables you want agents to use. Raily reads your tables where they are. It does not copy your data, re-embed your vectors, or change your database.`}),`\n`,_jsx(Note,{children:_jsxs(_components.p,{children:[`AlloyDB is available on request. `,_jsx(_components.a,{href:`https://www.raily.ai/contact`,children:`Contact us`}),` to turn it on for your Account.`]})}),`\n`,_jsx(Heading,{level:`2`,id:`before-you-start`,children:`Before you start`}),`\n`,_jsxs(_components.ul,{children:[`\n`,_jsxs(_components.li,{children:[_jsx(_components.strong,{children:`A database user Raily can log in with.`}),` Use a dedicated read-only user, not a database owner. It needs `,_jsx(_components.code,{children:`SELECT`}),` on the tables you want and `,_jsx(_components.code,{children:`USAGE`}),` on their schemas. Raily shows the commands to set this up during the connection (see step 3).`]}),`\n`,_jsxs(_components.li,{children:[_jsx(_components.strong,{children:`Public IP enabled on your AlloyDB instance.`}),` Instances with private IP only can’t be connected. Raily connects through Google’s authenticated connector, which verifies the server and encrypts the connection, so you don’t need to deploy a proxy or allowlist IP addresses. See Google’s guide to `,_jsx(_components.a,{href:`https://cloud.google.com/alloydb/docs/connect-public-ip`,children:`enabling public IP`}),`.`]}),`\n`,_jsxs(_components.li,{children:[_jsx(_components.strong,{children:`Two Google Cloud roles for Raily’s service account`}),` in the project that holds your instance: `,_jsx(_components.strong,{children:`AlloyDB Client`}),` and `,_jsx(_components.strong,{children:`Service Usage Consumer`}),`. These let Raily open a connection. They don’t give access to your tables.`]}),`\n`,_jsxs(_components.li,{children:[_jsx(_components.strong,{children:`For vector tables:`}),` each vector column must declare a fixed size (for example `,_jsx(_components.code,{children:`vector(768)`}),`), all vector columns in a table must have the same size, and the table needs an `,_jsx(_components.code,{children:`id`}),` column or a single-column primary key. You also need to know which embedding model and version created the vectors.`]}),`\n`]}),`\n`,_jsx(Heading,{level:`2`,id:`steps`,children:`Steps`}),`\n`,_jsxs(_components.p,{children:[`In the sidebar, open `,_jsx(_components.strong,{children:`Search Rail`}),` and click `,_jsx(_components.strong,{children:`Connect source`}),`. Then click the `,_jsx(_components.strong,{children:`Google Cloud AlloyDB`}),` card.`]}),`\n`,_jsxs(_components.p,{children:[`The form has three stages: `,_jsx(_components.strong,{children:`Connect`}),`, `,_jsx(_components.strong,{children:`Choose tables`}),`, and `,_jsx(_components.strong,{children:`Review`}),`.`]}),`\n`,_jsxs(Steps,{children:[_jsx(Step,{title:`Name the Source`,children:_jsxs(_components.p,{children:[`Enter a `,_jsx(_components.strong,{children:`Name`}),` for this connection.`]})}),_jsxs(Step,{title:`Enter the connection details`,children:[_jsxs(_components.ul,{children:[`\n`,_jsxs(_components.li,{children:[_jsx(_components.strong,{children:`Instance resource name`}),`: the full resource name of your instance, in the form `,_jsx(_components.code,{children:`projects/PROJECT_ID/locations/REGION/clusters/CLUSTER_ID/instances/INSTANCE_ID`}),`. Use the resource name, not the IP address. Open `,_jsx(_components.strong,{children:`Find your instance URI`}),` under the field if you need help finding it.`]}),`\n`,_jsxs(_components.li,{children:[_jsx(_components.strong,{children:`Database name`}),`: the database that holds your tables (not the cluster name).`]}),`\n`,_jsxs(_components.li,{children:[_jsx(_components.strong,{children:`Database username`}),`: defaults to `,_jsx(_components.code,{children:`raily_reader`}),`. Change it if your read-only user has a different name.`]}),`\n`,_jsxs(_components.li,{children:[_jsx(_components.strong,{children:`Database password`}),`: the password of that database user, not your Google account password.`]}),`\n`]}),_jsxs(_components.p,{children:[`If you already have a connection string, click `,_jsx(_components.strong,{children:`Paste a connection string instead`}),`. It must use the form `,_jsx(_components.code,{children:`postgresql://USER@alloydb/DATABASE?instance_uri=projects/...`}),`. Keep `,_jsx(_components.code,{children:`@alloydb`}),` as shown and leave the password out of the string. Enter it in `,_jsx(_components.strong,{children:`Database password`}),`.`]})]}),_jsxs(Step,{title:`Grant access (first connection only)`,children:[_jsxs(_components.p,{children:[`If you haven’t set up access yet, open `,_jsx(_components.strong,{children:`Set up access for a first connection`}),`. It shows commands filled in with your details, each with a copy button:`]}),_jsxs(_components.ol,{children:[`\n`,_jsxs(_components.li,{children:[_jsx(_components.strong,{children:`Google Cloud connection permissions`}),`: the Raily service account for your Account and two `,_jsx(_components.code,{children:`gcloud`}),` commands that grant it AlloyDB Client and Service Usage Consumer. Run them as someone who can update the project’s IAM policy. Don’t grant Owner or Editor.`]}),`\n`,_jsxs(_components.li,{children:[_jsx(_components.strong,{children:`Database read permissions`}),`: a `,_jsx(_components.code,{children:`GRANT pg_read_all_data`}),` command for your database user. This grants read access to every database in the cluster that the user can connect to. If you want to limit Raily to specific tables, skip it and use a user that already has `,_jsx(_components.code,{children:`SELECT`}),` on only those tables.`]}),`\n`]}),_jsxs(_components.p,{children:[`Two optional sections cover a database that restricts who can connect (`,_jsx(_components.strong,{children:`Allow connection to a restricted database`}),`) and creating a new read-only user (`,_jsx(_components.strong,{children:`Create a database user if you need one`}),`).`]}),_jsx(_components.p,{children:`Already have a user that can read your tables? Skip this step.`})]}),_jsx(Step,{title:`Test the connection`,children:_jsxs(_components.p,{children:[`Click `,_jsx(_components.strong,{children:`Test connection \u0026 load tables`}),`. When the test passes, click `,_jsx(_components.strong,{children:`Continue to tables`}),`.`]})}),_jsxs(Step,{title:`Choose tables`,children:[_jsx(_components.p,{children:`Raily lists every table and view the database user can read, grouped by schema. Select the ones you want.`}),_jsxs(_components.ul,{children:[`\n`,_jsxs(_components.li,{children:[_jsx(_components.strong,{children:`Tables with vectors`}),` need an embedding model. Pick the same model and version that created the table’s vectors. Models with a different vector size are disabled, but a matching size alone is not enough: it has to be the same model.`]}),`\n`,_jsxs(_components.li,{children:[_jsx(_components.strong,{children:`Regular tables`}),` show `,_jsx(_components.strong,{children:`Table analytics. No embedding model needed.`})]}),`\n`]}),_jsxs(_components.p,{children:[`Don’t have one yet? Open the embedding config picker and click `,_jsx(_components.strong,{children:`Create New`}),`.`]}),_jsx(Frame,{caption:`Create a new embedding config`,children:_jsx(OptimizedImage,{src:`https://mintcdn.com/railyai/LT7rWl_muWq2wYsL/images/vector-store/create1.png?fit=max\u0026auto=format\u0026n=LT7rWl_muWq2wYsL\u0026q=85\u0026s=61879b413bbc70398a16893cb781b2fc`,alt:`Embedding config picker with Create New`,\"data-og-width\":`384`,width:`384`,\"data-og-height\":`115`,height:`115`,\"data-path\":`images/vector-store/create1.png`,\"data-optimize\":`true`,\"data-opv\":`3`,srcset:`https://mintcdn.com/railyai/LT7rWl_muWq2wYsL/images/vector-store/create1.png?w=280\u0026fit=max\u0026auto=format\u0026n=LT7rWl_muWq2wYsL\u0026q=85\u0026s=77d4d4ff0ded1c38366c1d5f4f2c9c91 280w, https://mintcdn.com/railyai/LT7rWl_muWq2wYsL/images/vector-store/create1.png?w=560\u0026fit=max\u0026auto=format\u0026n=LT7rWl_muWq2wYsL\u0026q=85\u0026s=cba5305b5c9838c0d69c5bb26b7572a2 560w, https://mintcdn.com/railyai/LT7rWl_muWq2wYsL/images/vector-store/create1.png?w=840\u0026fit=max\u0026auto=format\u0026n=LT7rWl_muWq2wYsL\u0026q=85\u0026s=9e8cff45dbfc459a8e637a2ccda2f79a 840w, https://mintcdn.com/railyai/LT7rWl_muWq2wYsL/images/vector-store/create1.png?w=1100\u0026fit=max\u0026auto=format\u0026n=LT7rWl_muWq2wYsL\u0026q=85\u0026s=90abb8dabee04c360d5369323303bd54 1100w, https://mintcdn.com/railyai/LT7rWl_muWq2wYsL/images/vector-store/create1.png?w=1650\u0026fit=max\u0026auto=format\u0026n=LT7rWl_muWq2wYsL\u0026q=85\u0026s=1f08430a8bbc9a676bf83b73e6a3427f 1650w, https://mintcdn.com/railyai/LT7rWl_muWq2wYsL/images/vector-store/create1.png?w=2500\u0026fit=max\u0026auto=format\u0026n=LT7rWl_muWq2wYsL\u0026q=85\u0026s=566785f5a9fd4f51c31fd3c3b2d3a1ba 2500w`})}),_jsxs(_components.p,{children:[`Enter a `,_jsx(_components.strong,{children:`Name`}),`, pick a `,_jsx(_components.strong,{children:`Provider`}),`, and set the `,_jsx(_components.strong,{children:`Model Name`}),` and `,_jsx(_components.strong,{children:`Dimension`}),` to match the model that created your vectors. Add an `,_jsx(_components.strong,{children:`API Key`}),` if the provider needs one, then save.`]}),_jsx(Frame,{caption:`Embedding config form`,children:_jsx(OptimizedImage,{src:`https://mintcdn.com/railyai/LT7rWl_muWq2wYsL/images/vector-store/create2.png?fit=max\u0026auto=format\u0026n=LT7rWl_muWq2wYsL\u0026q=85\u0026s=7cd576be83273091a9c9f0f47df8a244`,alt:`Embedding config form fields`,\"data-og-width\":`592`,width:`592`,\"data-og-height\":`599`,height:`599`,\"data-path\":`images/vector-store/create2.png`,\"data-optimize\":`true`,\"data-opv\":`3`,srcset:`https://mintcdn.com/railyai/LT7rWl_muWq2wYsL/images/vector-store/create2.png?w=280\u0026fit=max\u0026auto=format\u0026n=LT7rWl_muWq2wYsL\u0026q=85\u0026s=9c7f841722de58359369201166628667 280w, https://mintcdn.com/railyai/LT7rWl_muWq2wYsL/images/vector-store/create2.png?w=560\u0026fit=max\u0026auto=format\u0026n=LT7rWl_muWq2wYsL\u0026q=85\u0026s=746d8574e020ebad79c0d8b58c5c3ee1 560w, https://mintcdn.com/railyai/LT7rWl_muWq2wYsL/images/vector-store/create2.png?w=840\u0026fit=max\u0026auto=format\u0026n=LT7rWl_muWq2wYsL\u0026q=85\u0026s=0a724221bebce92b67794179efb00234 840w, https://mintcdn.com/railyai/LT7rWl_muWq2wYsL/images/vector-store/create2.png?w=1100\u0026fit=max\u0026auto=format\u0026n=LT7rWl_muWq2wYsL\u0026q=85\u0026s=88b8b17772231dcfbeaa8890a14c36ab 1100w, https://mintcdn.com/railyai/LT7rWl_muWq2wYsL/images/vector-store/create2.png?w=1650\u0026fit=max\u0026auto=format\u0026n=LT7rWl_muWq2wYsL\u0026q=85\u0026s=3303562a5260ac75a11512968646fc65 1650w, https://mintcdn.com/railyai/LT7rWl_muWq2wYsL/images/vector-store/create2.png?w=2500\u0026fit=max\u0026auto=format\u0026n=LT7rWl_muWq2wYsL\u0026q=85\u0026s=c2545310cb683b1f989400bec3374d93 2500w`})}),_jsxs(_components.p,{children:[`If you selected any vector table, tick the box confirming that the model, version, and dimensions match each table’s existing embeddings. Then click `,_jsx(_components.strong,{children:`Continue to review`}),`.`]})]}),_jsxs(Step,{title:`Review and connect`,children:[_jsxs(_components.p,{children:[`Check the instance, database, database user, and each table. Vector tables show `,_jsx(_components.strong,{children:`Semantic search and analytics`}),` with the model you picked. Regular tables show `,_jsx(_components.strong,{children:`Analytics only`}),`.`]}),_jsxs(_components.p,{children:[`Click `,_jsx(_components.strong,{children:`Connect \u0026 generate configuration`}),`. Raily sets up search for each table automatically. Your database is not changed.`]})]}),_jsx(Step,{title:`Create an endpoint`,children:_jsxs(_components.p,{children:[`When the search configuration is ready, the Source page shows `,_jsx(_components.strong,{children:`Finish setup: create endpoint`}),`. Click it, confirm a name and sign-in, and create the endpoint your agents will connect to.`]})})]}),`\n`,_jsxs(_components.p,{children:[`When setup is done, the Source page shows which endpoints search it (`,_jsx(_components.strong,{children:`Searched by`}),`). Ask a question in `,_jsx(_components.strong,{children:`Test your endpoint`}),` to check the answers.`]}),`\n`,_jsxs(_components.p,{children:[`New tables you add to AlloyDB later are not picked up automatically. To add one, edit the Source, click `,_jsx(_components.strong,{children:`Test connection \u0026 load tables`}),` again, and select it.`]}),`\n`,_jsx(Heading,{level:`2`,id:`content-tables-and-data-tables`,children:`Content tables and data tables`}),`\n`,_jsx(_components.p,{children:`Raily looks at your database catalog and decides what each table can do. You don’t set this yourself.`}),`\n`,_jsxs(_components.p,{children:[_jsx(_components.strong,{children:`Tables with vectors`}),` hold content: articles, documents, products, support tickets. Agents use them to find rows by meaning, and they can also count and total those rows. Example questions:`]}),`\n`,_jsxs(_components.ul,{children:[`\n`,_jsx(_components.li,{children:`“What have we published about electric car subsidies?”`}),`\n`,_jsx(_components.li,{children:`“Find support tickets where customers complain about late delivery.”`}),`\n`,_jsx(_components.li,{children:`“How many articles about Switzerland were published in 2025, and show me a few.”`}),`\n`]}),`\n`,_jsxs(_components.p,{children:[_jsx(_components.strong,{children:`Regular tables`}),` (no vector column) hold records you want to measure: orders, events, sign-ups. Agents use them for counts, sums, averages, minimums, maximums, and earliest or latest dates, optionally grouped by a column or by day, week, month, or year. Example questions:`]}),`\n`,_jsxs(_components.ul,{children:[`\n`,_jsx(_components.li,{children:`“How many orders were placed in March 2026?”`}),`\n`,_jsx(_components.li,{children:`“What was the total revenue per region last year?”`}),`\n`,_jsx(_components.li,{children:`“What’s the average delivery time by month in 2025?”`}),`\n`]}),`\n`,_jsx(_components.p,{children:`A few things to know about table answers:`}),`\n`,_jsxs(_components.ul,{children:[`\n`,_jsxs(_components.li,{children:[_jsx(_components.strong,{children:`Raily computes calendar periods itself.`}),` When a question names a whole year, month, or day (“in March 2026”), Raily works out the start and end dates, so the count covers the full period. Periods and date groupings use UTC.`]}),`\n`,_jsxs(_components.li,{children:[_jsx(_components.strong,{children:`One table per answer.`}),` Raily doesn’t join tables. A question that needs data from two tables gets a separate answer from each, never a combined total.`]}),`\n`,_jsxs(_components.li,{children:[_jsx(_components.strong,{children:`One measure per question.`}),` Ask “how many orders” and “what was the total revenue” as two questions.`]}),`\n`,_jsxs(_components.li,{children:[_jsx(_components.strong,{children:`Grouped answers are capped.`}),` Raily returns up to 20 groups and says when more exist.`]}),`\n`,_jsxs(_components.li,{children:[_jsx(_components.strong,{children:`Counting distinct values and ranking are not supported.`}),` For example, “how many different customers ordered” or “top 5 products by sales”.`]}),`\n`,_jsxs(_components.li,{children:[_jsx(_components.strong,{children:`Regular tables can’t answer “find me” questions.`}),` They have no vectors to search by meaning. Ask them for a count or a total instead.`]}),`\n`]}),`\n`,_jsx(Heading,{level:`2`,id:`next-steps`,children:`Next steps`}),`\n`,_jsxs(CardGroup,{cols:2,children:[_jsx(Card,{title:`Create an AI endpoint`,icon:`server`,href:`/concepts/ai-endpoints`,children:_jsx(_components.p,{children:`Let agents search this source`})}),_jsx(Card,{title:`Data Catalog`,icon:`table-list`,href:`/integrations/data-catalog`,children:_jsx(_components.p,{children:`Review the fields agents filter on`})})]})]})}function MDXContent(props={}){const{wrapper:MDXLayout}={..._provideComponents(),...props.components};return MDXLayout?_jsx(MDXLayout,{...props,children:_jsx(_createMdxContent,{...props})}):_createMdxContent(props)}return{default:MDXContent};function _missingMdxReference(id,component){throw new Error(`Expected `+(component?`component`:`object`)+\" `\"+id+\"` to be defined: you likely forgot to import, pass, or provide it.\")}","frontmatter":{},"scope":{"config":{},"pageMetadata":{"title":"Connect AlloyDB","sidebarTitle":"AlloyDB","description":"Connect Google Cloud AlloyDB so AI agents can search your vector tables and answer counting and totals questions from your regular tables.","href":"/integrations/databases/alloydb"}}},"mdxSourceWithNoJs":null},"mdxExtracts":{"tableOfContents":[{"title":"Before you start","slug":"before-you-start","depth":2,"children":[]},{"title":"Steps","slug":"steps","depth":2,"children":[]},{"title":"Content tables and data tables","slug":"content-tables-and-data-tables","depth":2,"children":[]},{"title":"Next steps","slug":"next-steps","depth":2,"children":[]}],"codeExamples":{}},"jsLinks":[],"subdomain":"railyai","siteName":"Raily","title":"Connect AlloyDB - Raily","navMaps":{"firstHrefInVersion":{},"firstHrefInLanguage":{}},"lastModified":"2026-11-01T11:08:22.204Z","originalFileLocation":"integrations/databases/alloydb.mdx"},"headHtml":"\u003cscript data-mint-head>(function(){var d=document.documentElement,p=null;if(!p){try{p=localStorage.getItem(\"isDarkMode\")}catch(e){}if(p==='true')p='dark';else if(p==='false')p='light';if(p!=='light'\u0026\u0026p!=='dark'\u0026\u0026p!=='system')p=\"system\"}var r=p==='system'?(matchMedia(\"(prefers-color-scheme: dark)\").matches?'dark':'light'):p;d.classList.remove(r==='dark'?'light':'dark');d.classList.add(r);d.setAttribute(\"data-theme-preference\",p)})();\u003c/script>\u003cmeta data-mint-head name=\"description\" content=\"Connect Google Cloud AlloyDB so AI agents can search your vector tables and answer counting and totals questions from your regular tables.\">\u003cmeta data-mint-head name=\"application-name\" content=\"Raily\">\u003cmeta data-mint-head name=\"generator\" content=\"Mintlify\">\u003clink data-mint-head rel=\"icon\" type=\"image/png\" sizes=\"192x192\" href=\"/mintlify-assets/_mintlify/favicons/railyai/JBp0SGBh-RR4utWj/_generated/favicon/android-chrome-192x192.png\" media=\"(prefers-color-scheme: light)\">\u003clink data-mint-head rel=\"apple-touch-icon\" type=\"image/png\" sizes=\"180x180\" href=\"/mintlify-assets/_mintlify/favicons/railyai/JBp0SGBh-RR4utWj/_generated/favicon/apple-touch-icon.png\">\u003clink data-mint-head rel=\"icon\" type=\"image/png\" sizes=\"16x16\" href=\"/mintlify-assets/_mintlify/favicons/railyai/JBp0SGBh-RR4utWj/_generated/favicon/favicon-16x16.png\" media=\"(prefers-color-scheme: light)\">\u003clink data-mint-head rel=\"icon\" type=\"image/png\" sizes=\"32x32\" href=\"/mintlify-assets/_mintlify/favicons/railyai/JBp0SGBh-RR4utWj/_generated/favicon/favicon-32x32.png\" media=\"(prefers-color-scheme: light)\">\u003clink data-mint-head rel=\"shortcut icon\" type=\"image/x-icon\" href=\"/mintlify-assets/_mintlify/favicons/railyai/JBp0SGBh-RR4utWj/_generated/favicon/favicon.ico\" media=\"(prefers-color-scheme: light)\">\u003clink data-mint-head rel=\"icon\" type=\"image/png\" sizes=\"192x192\" href=\"/mintlify-assets/_mintlify/favicons/railyai/JBp0SGBh-RR4utWj/_generated/favicon-dark/android-chrome-192x192.png\" media=\"(prefers-color-scheme: dark)\">\u003clink data-mint-head rel=\"icon\" type=\"image/png\" sizes=\"16x16\" href=\"/mintlify-assets/_mintlify/favicons/railyai/JBp0SGBh-RR4utWj/_generated/favicon-dark/favicon-16x16.png\" media=\"(prefers-color-scheme: dark)\">\u003clink data-mint-head rel=\"icon\" type=\"image/png\" sizes=\"32x32\" href=\"/mintlify-assets/_mintlify/favicons/railyai/JBp0SGBh-RR4utWj/_generated/favicon-dark/favicon-32x32.png\" media=\"(prefers-color-scheme: dark)\">\u003clink data-mint-head rel=\"shortcut icon\" type=\"image/x-icon\" href=\"/mintlify-assets/_mintlify/favicons/railyai/JBp0SGBh-RR4utWj/_generated/favicon-dark/favicon.ico\" media=\"(prefers-color-scheme: dark)\">\u003cmeta data-mint-head property=\"og:title\" content=\"Connect AlloyDB - Raily\">\u003cmeta data-mint-head property=\"og:description\" content=\"Connect Google Cloud AlloyDB so AI agents can search your vector tables and answer counting and totals questions from your regular tables.\">\u003cmeta data-mint-head property=\"og:site_name\" content=\"Raily\">\u003cmeta data-mint-head property=\"og:url\" content=\"https://docs.raily.ai/integrations/databases/alloydb\">\u003cmeta data-mint-head property=\"og:type\" content=\"website\">\u003cmeta data-mint-head property=\"og:image\" content=\"https://railyai.mintlify.site/_mintlify/api/og/v2?division=Databases\u0026amp;title=Connect+AlloyDB\u0026amp;description=Connect+Google+Cloud+AlloyDB+so+AI+agents+can+search+your+vector+tables+and+answer+counting+and+totals+questions+from+your+regular+tables.\u0026amp;theme=b3f7a79824259f310d3e45ba\u0026amp;signature=3c3fb0026e956d6206ac200af8a7d9ddbd2c5ddc9ce6f52f97e3d0f0a2c46a4b\">\u003cmeta data-mint-head property=\"og:image:width\" content=\"1200\">\u003cmeta data-mint-head property=\"og:image:height\" content=\"630\">\u003cmeta data-mint-head name=\"twitter:card\" content=\"summary_large_image\">\u003cmeta data-mint-head name=\"twitter:title\" content=\"Connect AlloyDB - Raily\">\u003cmeta data-mint-head name=\"twitter:description\" content=\"Connect Google Cloud AlloyDB so AI agents can search your vector tables and answer counting and totals questions from your regular tables.\">\u003cmeta data-mint-head name=\"twitter:image\" content=\"https://railyai.mintlify.site/_mintlify/api/og/v2?division=Databases\u0026amp;title=Connect+AlloyDB\u0026amp;description=Connect+Google+Cloud+AlloyDB+so+AI+agents+can+search+your+vector+tables+and+answer+counting+and+totals+questions+from+your+regular+tables.\u0026amp;theme=b3f7a79824259f310d3e45ba\u0026amp;signature=3c3fb0026e956d6206ac200af8a7d9ddbd2c5ddc9ce6f52f97e3d0f0a2c46a4b\">\u003cmeta data-mint-head name=\"twitter:image:width\" content=\"1200\">\u003cmeta data-mint-head name=\"twitter:image:height\" content=\"630\">\u003cmeta data-mint-head name=\"msapplication-config\" content=\"/mintlify-assets/_mintlify/favicons/railyai/JBp0SGBh-RR4utWj/_generated/favicon/browserconfig.xml\">\u003cmeta data-mint-head name=\"apple-mobile-web-app-title\" content=\"Raily\">\u003cmeta data-mint-head name=\"msapplication-TileColor\" content=\"#4F46E5\">\u003clink data-mint-head rel=\"canonical\" href=\"https://docs.raily.ai/integrations/databases/alloydb\">\u003clink data-mint-head rel=\"alternate\" type=\"application/xml\" href=\"/sitemap.xml\">\u003clink data-mint-head rel=\"alternate\" type=\"text/markdown\" href=\"/integrations/databases/alloydb.md\">\u003cscript data-mint-head type=\"application/ld+json\">{\"@context\":\"https://schema.org\",\"@graph\":[{\"@type\":\"Organization\",\"@id\":\"https://docs.raily.ai/#organization\",\"name\":\"Raily\",\"url\":\"https://docs.raily.ai\",\"logo\":{\"@type\":\"ImageObject\",\"url\":\"https://mintcdn.com/railyai/xbbAvRXwh2aN81tn/logo/light.svg?fit=max\u0026auto=format\u0026n=xbbAvRXwh2aN81tn\u0026q=85\u0026s=c95fa56069c37e1e973e88d9b7d21bc5\"}},{\"@type\":\"WebSite\",\"@id\":\"https://docs.raily.ai#website\",\"name\":\"Raily\",\"url\":\"https://docs.raily.ai\",\"publisher\":{\"@id\":\"https://docs.raily.ai/#organization\"}},{\"@type\":\"WebPage\",\"@id\":\"https://docs.raily.ai/integrations/databases/alloydb#webpage\",\"url\":\"https://docs.raily.ai/integrations/databases/alloydb\",\"name\":\"Connect AlloyDB\",\"description\":\"Connect Google Cloud AlloyDB so AI agents can search your vector tables and answer counting and totals questions from your regular tables.\",\"dateModified\":\"2026-11-01T11:08:22.204Z\",\"isPartOf\":{\"@id\":\"https://docs.raily.ai#website\"},\"breadcrumb\":{\"@id\":\"https://docs.raily.ai/integrations/databases/alloydb#breadcrumb\"}},{\"@type\":\"BreadcrumbList\",\"@id\":\"https://docs.raily.ai/integrations/databases/alloydb#breadcrumb\",\"itemListElement\":[{\"@type\":\"ListItem\",\"position\":1,\"name\":\"Integrations\",\"item\":\"https://docs.raily.ai/integrations/overview\"},{\"@type\":\"ListItem\",\"position\":2,\"name\":\"Connect AlloyDB\",\"item\":\"https://docs.raily.ai/integrations/databases/alloydb\"}]},{\"@type\":[\"Article\",\"TechArticle\"],\"@id\":\"https://docs.raily.ai/integrations/databases/alloydb#article\",\"headline\":\"Connect AlloyDB\",\"name\":\"Connect AlloyDB\",\"description\":\"Connect Google Cloud AlloyDB so AI agents can search your vector tables and answer counting and totals questions from your regular tables.\",\"url\":\"https://docs.raily.ai/integrations/databases/alloydb\",\"mainEntityOfPage\":{\"@id\":\"https://docs.raily.ai/integrations/databases/alloydb#webpage\"},\"dateModified\":\"2026-11-01T11:08:22.204Z\",\"publisher\":{\"@id\":\"https://docs.raily.ai/#organization\"},\"isPartOf\":{\"@id\":\"https://docs.raily.ai#website\"}}]}\u003c/script>\u003cscript data-mint-head type=\"application/ld+json\">{\"@context\":\"https://schema.org\",\"@type\":\"WebSite\",\"name\":\"Raily\",\"publisher\":{\"@type\":\"Organization\",\"name\":\"Raily\"},\"provider\":{\"@type\":\"Organization\",\"name\":\"Mintlify\",\"url\":\"https://mintlify.com\"}}\u003c/script>","agentPointerHref":"/integrations/databases/alloydb.md","siteName":"Raily","nav":{"global":null,"tabs":[{"tab":"Documentation","groups":[{"group":"Getting Started","pages":[{"title":"Welcome to Raily","sidebarTitle":"Welcome to Raily","href":""},{"title":"Quickstart","href":"/quickstart"},{"title":"See It in Action","href":"/getting-started/see-it-in-action"}]},{"group":"Connect Data to AI","pages":[{"title":"Connect a Raily MCP endpoint to Claude","sidebarTitle":"Claude","href":"/connect/claude"},{"title":"Connect a Raily MCP endpoint to ChatGPT","sidebarTitle":"ChatGPT","href":"/connect/chatgpt"},{"title":"Search with the SDK","sidebarTitle":"SDK quickstart","href":"/connect/sdk"},{"title":"Connect an agent over A2A","sidebarTitle":"Agent-to-Agent (A2A)","href":"/connect/a2a"}]},{"group":"SDKs","pages":[{"title":"SDKs","sidebarTitle":"Overview","href":"/sdks/overview"},{"title":"Python SDK","href":"/sdks/python"},{"title":"TypeScript SDK","sidebarTitle":"TypeScript","href":"/sdks/javascript"}]},{"group":"Core Concepts","pages":[{"title":"Create and configure AI endpoints","sidebarTitle":"AI Endpoints","href":"/concepts/ai-endpoints"},{"title":"Configure sign-in providers for MCP endpoints","sidebarTitle":"Providers","href":"/concepts/identities-and-auth"},{"title":"Discoverability","sidebarTitle":"Discoverability","href":"/concepts/discoverability"},{"title":"Raily Agentic Layer","sidebarTitle":"Agentic Layer","href":"/concepts/agentic-layer"}]},{"group":"Features","pages":[{"title":"Access control for MCP endpoints","sidebarTitle":"Access","href":"/features/access"},{"title":"Add and manage MCP endpoint users","sidebarTitle":"Users","href":"/features/users"},{"title":"Give an endpoint its own address","sidebarTitle":"Custom domains","href":"/features/custom-domains"},{"title":"Add chat to an endpoint and your website","sidebarTitle":"Chat","href":"/features/chat"},{"title":"Turn on deep research for an endpoint","sidebarTitle":"Deep research","href":"/features/deep-research"},{"title":"Read your analytics","sidebarTitle":"Analytics","href":"/features/analytics"},{"title":"Check search quality with evaluations","sidebarTitle":"Evaluations","href":"/features/evals"},{"title":"Discoverability","sidebarTitle":"Discoverability","href":"/features/discoverability"}]},{"group":"Integrations","pages":[{"title":"Integrations Overview","sidebarTitle":"Overview","href":"/integrations/overview"},{"title":"LLM Providers","sidebarTitle":"LLM Providers","href":"/integrations/llm-providers"},{"title":"Use your own Google AI key","sidebarTitle":"Your own model key","href":"/integrations/model-keys"},{"group":"Storage","pages":[{"title":"Storage Overview","sidebarTitle":"Overview","href":"/integrations/storage/overview"},{"title":"Amazon S3 Storage","sidebarTitle":"S3","href":"/integrations/storage/s3"},{"title":"Raily Storage","sidebarTitle":"Raily Storage","href":"/integrations/storage/raily-storage"}]},{"title":"Add a Vector Store","sidebarTitle":"Vector Store","description":"Connect a vector database to Raily so your collections become searchable","href":"/integrations/vector-store/overview"},{"group":"Databases","pages":[{"title":"Connect AlloyDB","sidebarTitle":"AlloyDB","href":"/integrations/databases/alloydb"}]},{"group":"Content sources","pages":[{"title":"Connect a WordPress site","sidebarTitle":"WordPress","description":"Make the posts, pages, and custom content of a WordPress site searchable, including PDFs embedded in your articles","href":"/integrations/sources/wordpress"},{"title":"Connect an RSS or Atom feed","sidebarTitle":"RSS / Atom","href":"/integrations/sources/rss"},{"title":"Connect a YouTube channel","sidebarTitle":"YouTube","href":"/integrations/sources/youtube"},{"title":"Connect Livingdocs","sidebarTitle":"Livingdocs","href":"/integrations/sources/livingdocs"},{"title":"Connect your API","sidebarTitle":"API source","href":"/integrations/sources/api-source"}]},{"title":"Data Catalog","sidebarTitle":"Data Catalog","href":"/integrations/data-catalog"}]}]}]},"basePath":"","title":"Connect AlloyDB - Raily","deploymentId":"dpl_7AgmPo2RyRWZ68ZGceW618SWGEAz","buildId":"dpl_7AgmPo2RyRWZ68ZGceW618SWGEAz","dynamics":["07c022d89b","a74be98ba7"],"chunks":["Frame-CvAlztAG.js","DynamicMarkdown-T8UDalrO.js","zoom-image-lightbox-HqsaJYmF.js","lightbox-handle-r17bVUz3.js"]}