> ## Documentation Index
> Fetch the complete documentation index at: https://docs.raily.ai/llms.txt
> Use this file to discover all available pages before exploring further.
# Add a Vector Store
> Connect a vector database to Raily so your collections become searchable
Connect a vector database (Qdrant, Pinecone, and others) to Raily. Once connected, Raily can search its collections with access control and usage tracking on top.
The steps are similar for every provider. Pick your provider in the tabs below for its connection fields and steps.
## What you can do
Once a vector store is connected, Raily searches it with:
* **Semantic search** - find content by meaning, not just keywords.
* **Metadata filtering** - narrow results by date, author, category, or any field in your [Data Catalog](/integrations/data-catalog).
* **Hybrid search** - combine semantic similarity with keyword matching.
* **RAG** - feed retrieved passages to an LLM so its answers are grounded in your content.
Access control and usage analytics apply to every search, whichever provider you connect.
## Before you start
* Admin access to the tenant.
* The connection details for your vector store (URL, API key, or connection string).
* At least one collection (or index/table) that already holds embeddings.
## Steps
In the sidebar, open **Search Rail** (under **Rails**) and click **Connect source**.
 Then pick your provider and follow its steps.
Click the **Qdrant** card.
* **Name** for the integration.
* **Qdrant URL**, for example `your-project.europe-west3-0.gcp.cloud.qdrant.io:6333`.
* **API Key**. Required for Qdrant Cloud, optional for local Qdrant.
Then pick your provider and follow its steps.
Click the **Qdrant** card.
* **Name** for the integration.
* **Qdrant URL**, for example `your-project.europe-west3-0.gcp.cloud.qdrant.io:6333`.
* **API Key**. Required for Qdrant Cloud, optional for local Qdrant.
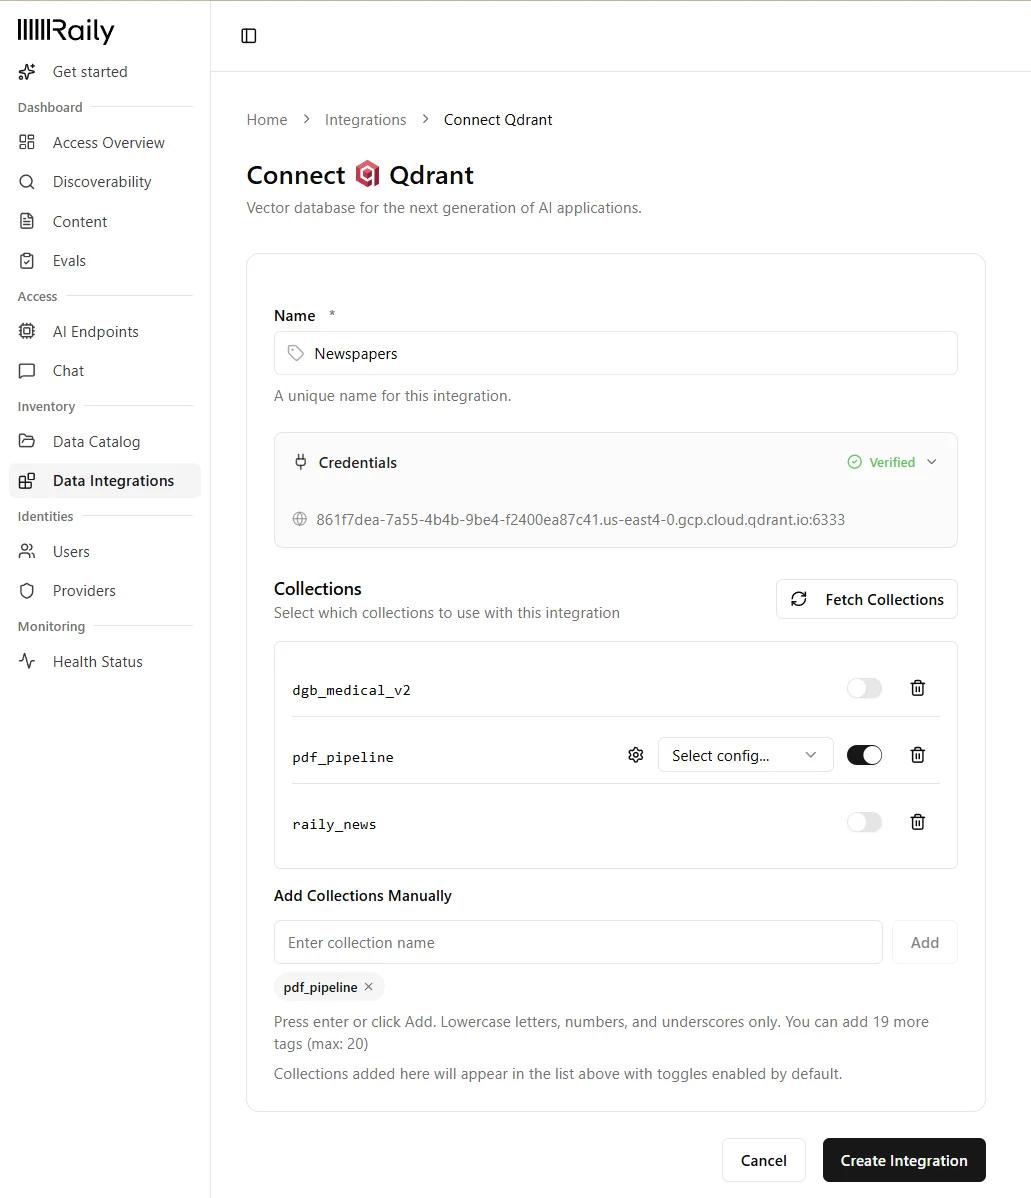 Click **Fetch Collections** and enable the ones you want, or add a collection by name (lowercase letters, numbers, and underscores).
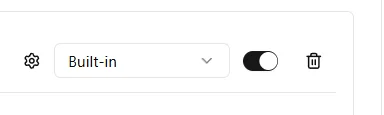
Pick an embedding config for each collection. It must match the model that created the vectors.
Don't have one yet? Open the embedding config picker and click **Create New**.
Click **Fetch Collections** and enable the ones you want, or add a collection by name (lowercase letters, numbers, and underscores).
Pick an embedding config for each collection. It must match the model that created the vectors.
Don't have one yet? Open the embedding config picker and click **Create New**.
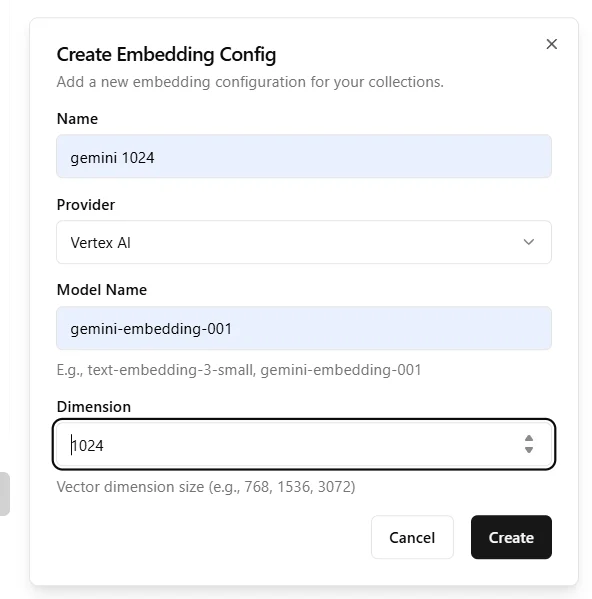
 Enter a **Name**, pick a **Provider**, and set the **Model Name** and **Dimension** to match the model that created your vectors. Add an **API Key** if the provider needs one, then save.
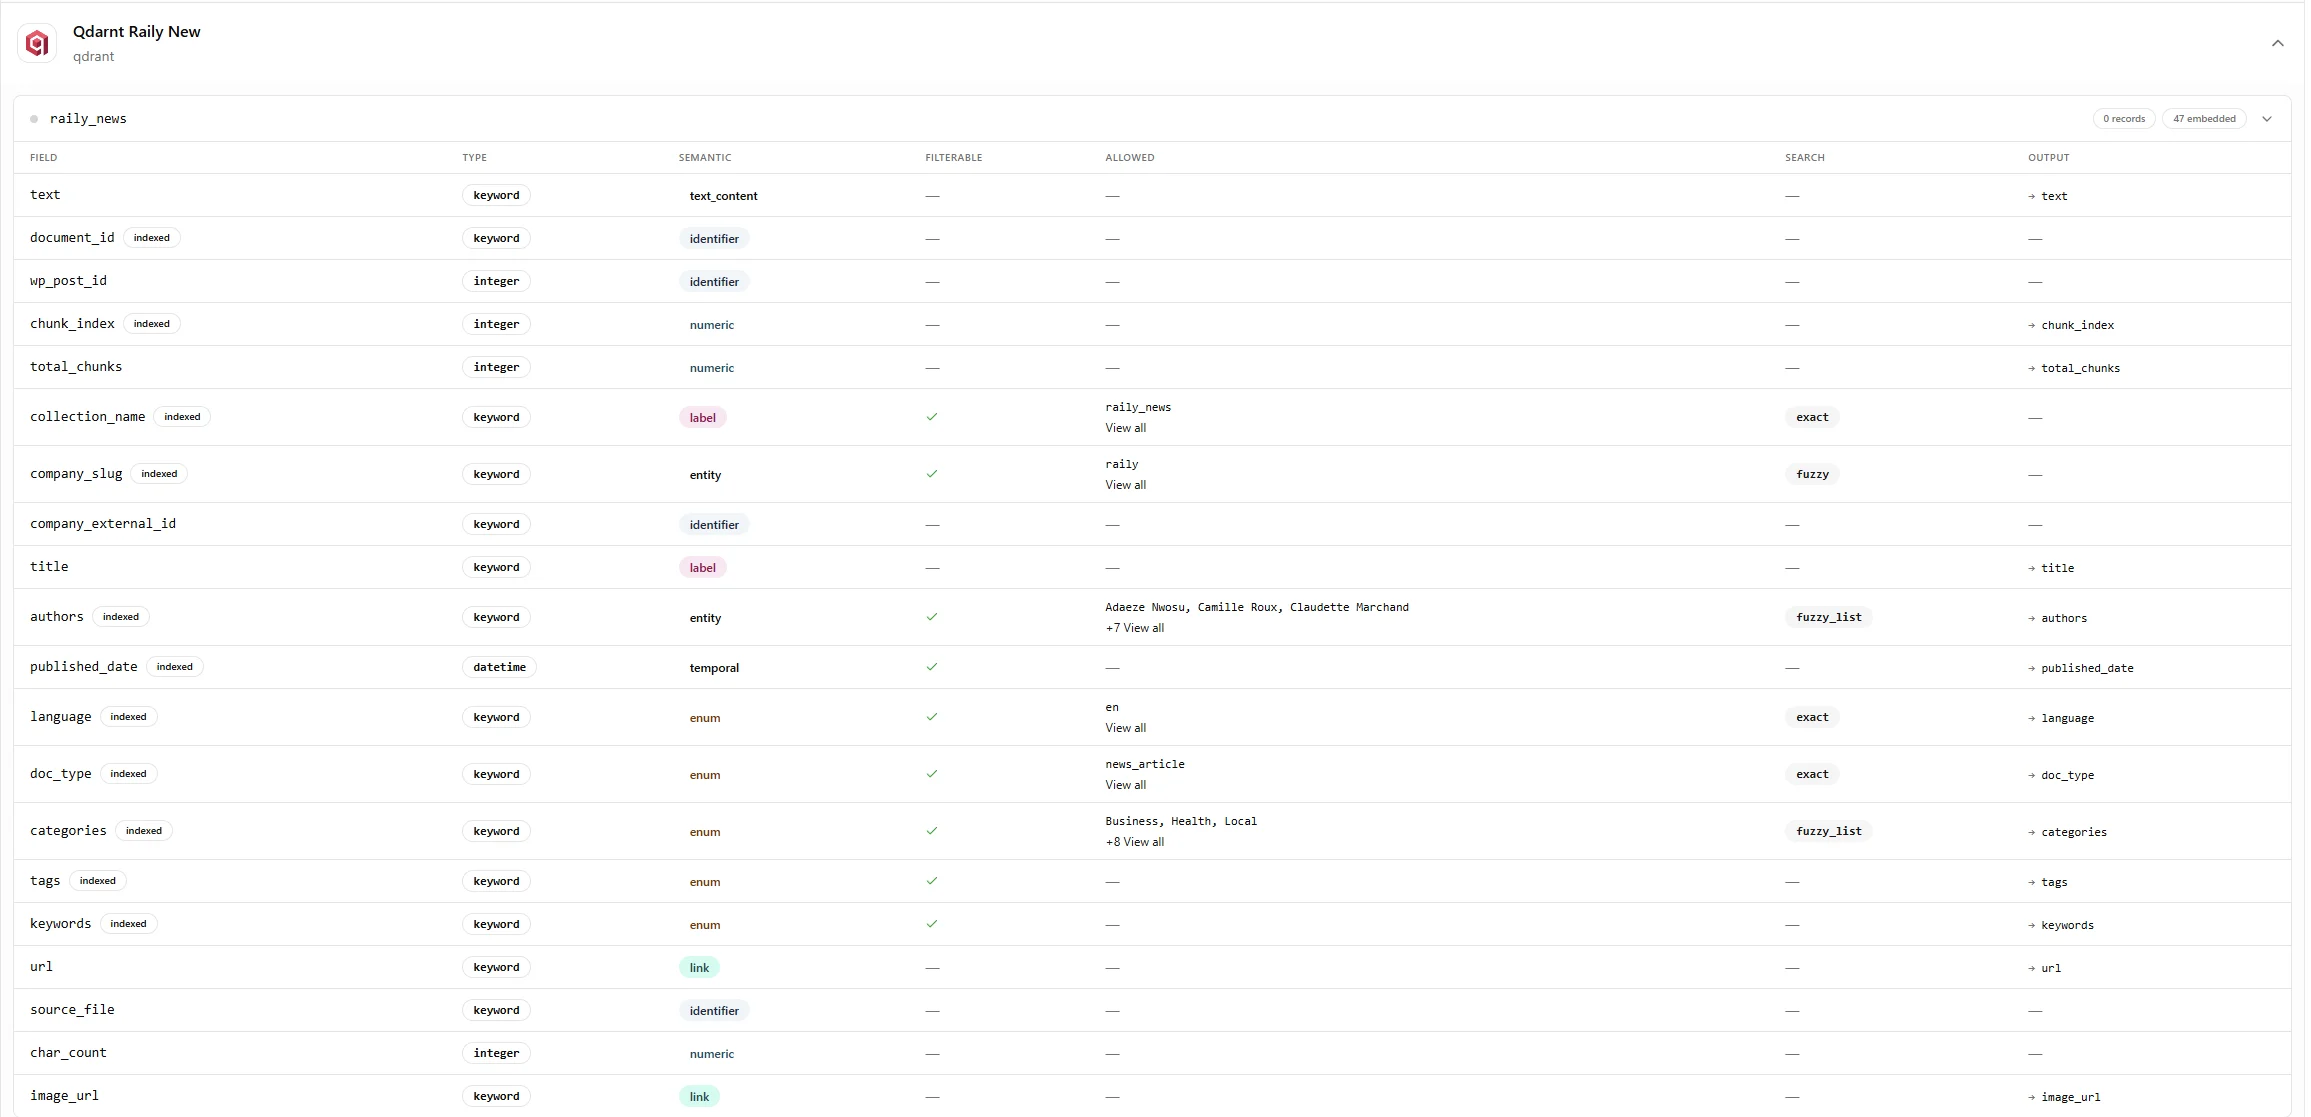
 Click **Create Integration**. Raily then configures agentic search for each collection automatically. This can take a few minutes, after which the integration appears under **My Integrations** with an **Active** status.
Once it finishes, open **Inventory → Data Catalog** to see the generated configuration for each collection.
After generation finishes, Raily opens the collection in **Data Catalog**.
Click **Create Integration**. Raily then configures agentic search for each collection automatically. This can take a few minutes, after which the integration appears under **My Integrations** with an **Active** status.
Once it finishes, open **Inventory → Data Catalog** to see the generated configuration for each collection.
After generation finishes, Raily opens the collection in **Data Catalog**.
 Click the **Pinecone** card.
* **Name** for the integration.
* **API Key** from your Pinecone console.
Click the **Pinecone** card.
* **Name** for the integration.
* **API Key** from your Pinecone console.
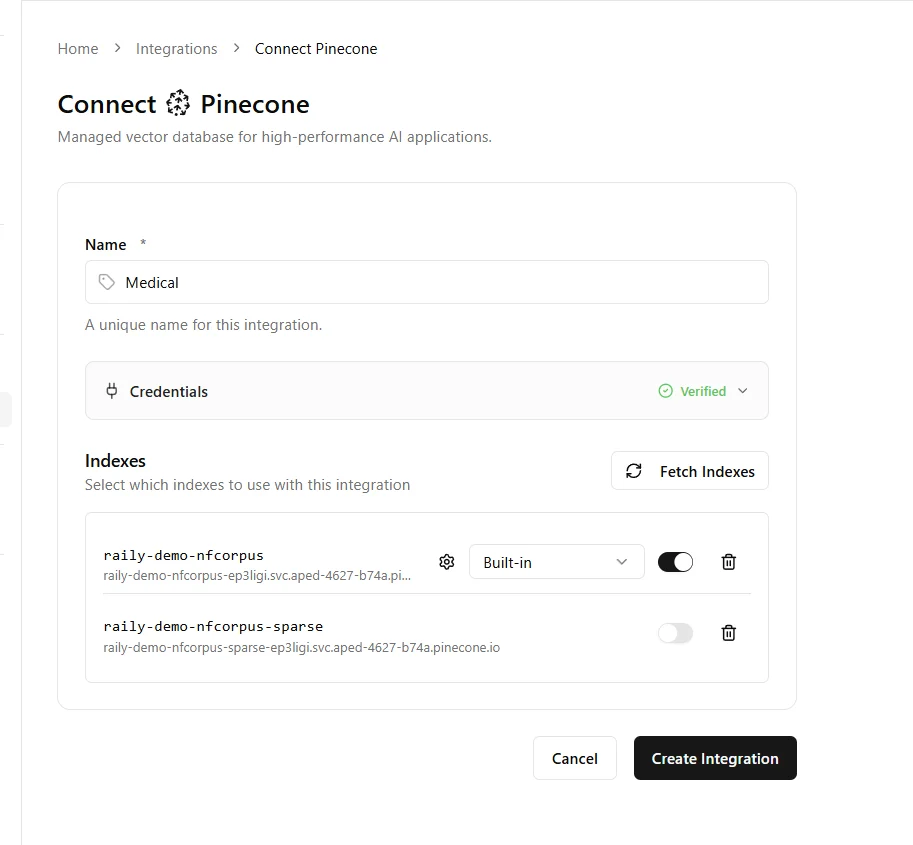 Click **Fetch Indexes** and enable the ones you want. Each enabled index needs its **Index Host URL**, which Raily fills in from Pinecone.
Pick an embedding config for each index. It must match the model that created the vectors. If embeddings are server-generated, set the config to **built-in**.
Don't have one yet? Open the embedding config picker and click **Create New**.
Enter a **Name**, pick a **Provider**, and set the **Model Name** and **Dimension** to match the model that created your vectors. Add an **API Key** if the provider needs one, then save.
Click **Create Integration**. Raily then configures agentic search for each collection automatically. This can take a few minutes, after which the integration appears under **My Integrations** with an **Active** status.
Once it finishes, open **Inventory → Data Catalog** to see the generated configuration for each collection.
After generation finishes, Raily opens the collection in **Data Catalog**.
Click **Fetch Indexes** and enable the ones you want. Each enabled index needs its **Index Host URL**, which Raily fills in from Pinecone.
Pick an embedding config for each index. It must match the model that created the vectors. If embeddings are server-generated, set the config to **built-in**.
Don't have one yet? Open the embedding config picker and click **Create New**.
Enter a **Name**, pick a **Provider**, and set the **Model Name** and **Dimension** to match the model that created your vectors. Add an **API Key** if the provider needs one, then save.
Click **Create Integration**. Raily then configures agentic search for each collection automatically. This can take a few minutes, after which the integration appears under **My Integrations** with an **Active** status.
Once it finishes, open **Inventory → Data Catalog** to see the generated configuration for each collection.
After generation finishes, Raily opens the collection in **Data Catalog**.
 Click the **Zilliz** card.
* **Name** for the integration.
* **Cluster endpoint URL**, for example `your-cluster.serverless.gcp-us-west1.cloud.zilliz.com`.
* **API Key** for your Zilliz Cloud cluster.
Click the **Zilliz** card.
* **Name** for the integration.
* **Cluster endpoint URL**, for example `your-cluster.serverless.gcp-us-west1.cloud.zilliz.com`.
* **API Key** for your Zilliz Cloud cluster.
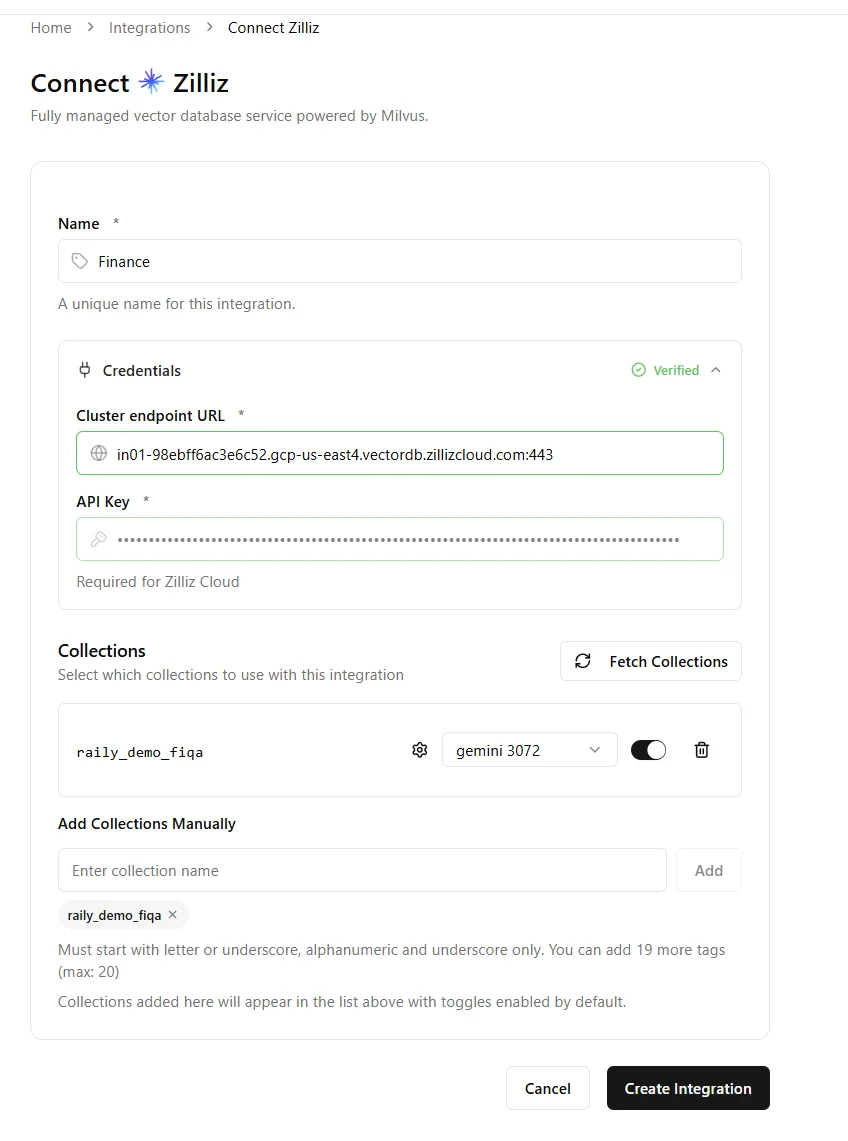 Click **Fetch Collections** and enable the ones you want, or add a collection by name (start with a letter or underscore; letters, numbers, and underscores).
Pick an embedding config for each collection. It must match the model that created the vectors.
Don't have one yet? Open the embedding config picker and click **Create New**.
Enter a **Name**, pick a **Provider**, and set the **Model Name** and **Dimension** to match the model that created your vectors. Add an **API Key** if the provider needs one, then save.
Click **Create Integration**. Raily then configures agentic search for each collection automatically. This can take a few minutes, after which the integration appears under **My Integrations** with an **Active** status.
Once it finishes, open **Inventory → Data Catalog** to see the generated configuration for each collection.
After generation finishes, Raily opens the collection in **Data Catalog**.
Click **Fetch Collections** and enable the ones you want, or add a collection by name (start with a letter or underscore; letters, numbers, and underscores).
Pick an embedding config for each collection. It must match the model that created the vectors.
Don't have one yet? Open the embedding config picker and click **Create New**.
Enter a **Name**, pick a **Provider**, and set the **Model Name** and **Dimension** to match the model that created your vectors. Add an **API Key** if the provider needs one, then save.
Click **Create Integration**. Raily then configures agentic search for each collection automatically. This can take a few minutes, after which the integration appears under **My Integrations** with an **Active** status.
Once it finishes, open **Inventory → Data Catalog** to see the generated configuration for each collection.
After generation finishes, Raily opens the collection in **Data Catalog**.
 Click the **Milvus** card.
* **Name** for the integration.
* **Cluster endpoint URL**, for example `milvus.your-company.com`.
* **API Key**. Optional for self-hosted Milvus.
Click **Fetch Collections** and enable the ones you want, or add a collection by name (start with a letter or underscore; letters, numbers, and underscores).
Pick an embedding config for each collection. It must match the model that created the vectors.
Don't have one yet? Open the embedding config picker and click **Create New**.
Enter a **Name**, pick a **Provider**, and set the **Model Name** and **Dimension** to match the model that created your vectors. Add an **API Key** if the provider needs one, then save.
Click **Create Integration**. Raily then configures agentic search for each collection automatically. This can take a few minutes, after which the integration appears under **My Integrations** with an **Active** status.
Once it finishes, open **Inventory → Data Catalog** to see the generated configuration for each collection.
Click the **Weaviate** card.
* **Name** for the integration.
* **Weaviate URL**, for example `your-cluster.c0.europe-west3.gcp.weaviate.cloud`.
* **API Key**. Required for Weaviate Cloud, optional if your instance has no authentication.
Click the **Milvus** card.
* **Name** for the integration.
* **Cluster endpoint URL**, for example `milvus.your-company.com`.
* **API Key**. Optional for self-hosted Milvus.
Click **Fetch Collections** and enable the ones you want, or add a collection by name (start with a letter or underscore; letters, numbers, and underscores).
Pick an embedding config for each collection. It must match the model that created the vectors.
Don't have one yet? Open the embedding config picker and click **Create New**.
Enter a **Name**, pick a **Provider**, and set the **Model Name** and **Dimension** to match the model that created your vectors. Add an **API Key** if the provider needs one, then save.
Click **Create Integration**. Raily then configures agentic search for each collection automatically. This can take a few minutes, after which the integration appears under **My Integrations** with an **Active** status.
Once it finishes, open **Inventory → Data Catalog** to see the generated configuration for each collection.
Click the **Weaviate** card.
* **Name** for the integration.
* **Weaviate URL**, for example `your-cluster.c0.europe-west3.gcp.weaviate.cloud`.
* **API Key**. Required for Weaviate Cloud, optional if your instance has no authentication.
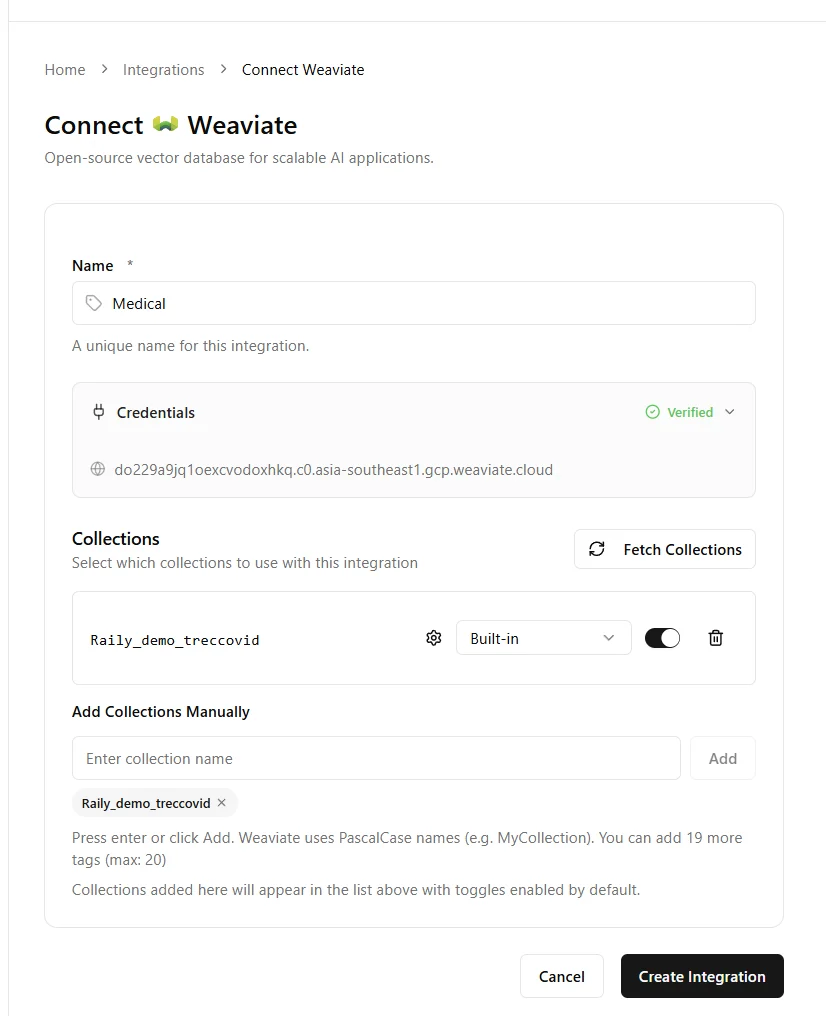 Click **Fetch Collections** and enable the ones you want, or add a collection by name. Weaviate uses PascalCase names, for example `MyCollection`.
Pick an embedding config for each collection. It must match the model that created the vectors. If embeddings are server-generated, set the config to **built-in**.
Don't have one yet? Open the embedding config picker and click **Create New**.
Enter a **Name**, pick a **Provider**, and set the **Model Name** and **Dimension** to match the model that created your vectors. Add an **API Key** if the provider needs one, then save.
Click **Create Integration**. Raily then configures agentic search for each collection automatically. This can take a few minutes, after which the integration appears under **My Integrations** with an **Active** status.
Once it finishes, open **Inventory → Data Catalog** to see the generated configuration for each collection.
After generation finishes, Raily opens the collection in **Data Catalog**.
Click **Fetch Collections** and enable the ones you want, or add a collection by name. Weaviate uses PascalCase names, for example `MyCollection`.
Pick an embedding config for each collection. It must match the model that created the vectors. If embeddings are server-generated, set the config to **built-in**.
Don't have one yet? Open the embedding config picker and click **Create New**.
Enter a **Name**, pick a **Provider**, and set the **Model Name** and **Dimension** to match the model that created your vectors. Add an **API Key** if the provider needs one, then save.
Click **Create Integration**. Raily then configures agentic search for each collection automatically. This can take a few minutes, after which the integration appears under **My Integrations** with an **Active** status.
Once it finishes, open **Inventory → Data Catalog** to see the generated configuration for each collection.
After generation finishes, Raily opens the collection in **Data Catalog**.
 Click the **pgVector** card.
* **Name** for the integration.
* **Connection String**, for example `postgresql://user@host:5432/dbname`.
* **Password**. Optional if the password is already in the connection string.
Click the **pgVector** card.
* **Name** for the integration.
* **Connection String**, for example `postgresql://user@host:5432/dbname`.
* **Password**. Optional if the password is already in the connection string.
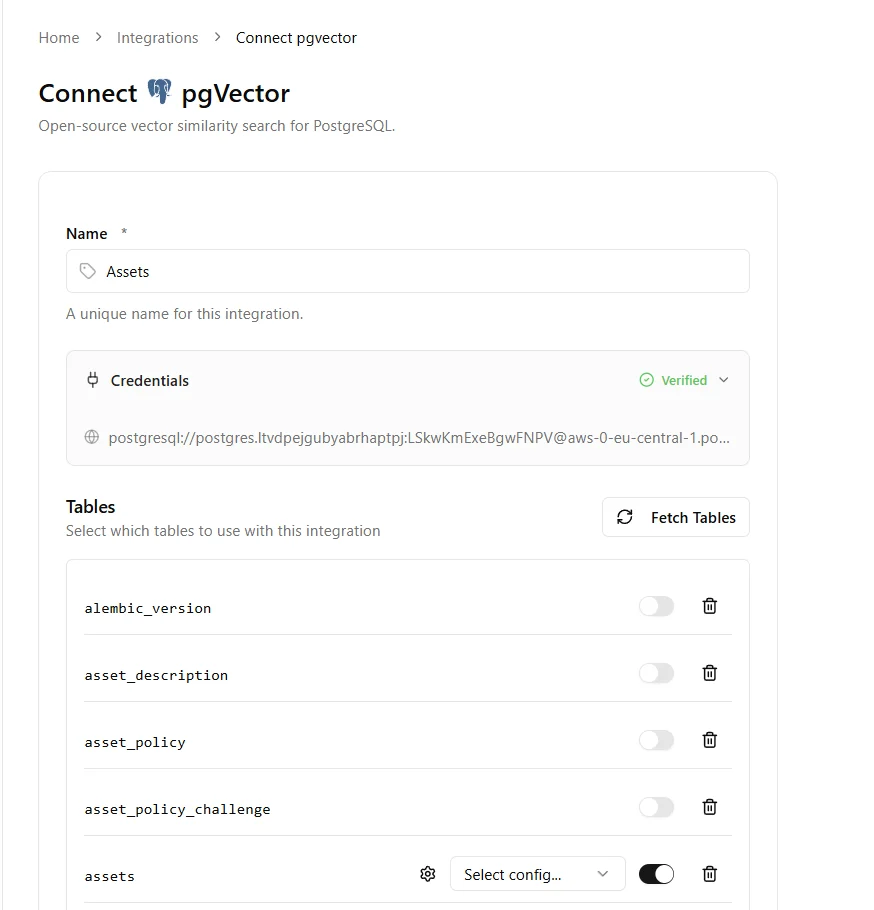 Raily checks the credentials automatically. The **Credentials** section shows **Verified** when they work, or **Failed** if not.
Click **Fetch Tables** and enable the ones you want, or add a table by name. Schema-qualified names are supported, for example `public.documents`.
Pick an embedding config for each table. It must match the model that created the vectors.
Don't have one yet? Open the embedding config picker and click **Create New**.
Enter a **Name**, pick a **Provider**, and set the **Model Name** and **Dimension** to match the model that created your vectors. Add an **API Key** if the provider needs one, then save.
Click **Create Integration**. Raily then configures agentic search for each collection automatically. This can take a few minutes, after which the integration appears under **My Integrations** with an **Active** status.
Once it finishes, open **Inventory → Data Catalog** to see the generated configuration for each collection.
Click the **Oracle** card.
* **Name** for the integration.
* **Connection String** in Easy Connect form, for example `user@host:1521/FREEPDB1`. For Autonomous Database, add `?wallet_location=...`.
* **Password**. Optional if the password is already in the connection string.
Raily checks the credentials automatically. The **Credentials** section shows **Verified** when they work, or **Failed** if not.
Click **Fetch Tables** and enable the ones you want, or add a table by name. Schema-qualified names are supported, for example `public.documents`.
Pick an embedding config for each table. It must match the model that created the vectors.
Don't have one yet? Open the embedding config picker and click **Create New**.
Enter a **Name**, pick a **Provider**, and set the **Model Name** and **Dimension** to match the model that created your vectors. Add an **API Key** if the provider needs one, then save.
Click **Create Integration**. Raily then configures agentic search for each collection automatically. This can take a few minutes, after which the integration appears under **My Integrations** with an **Active** status.
Once it finishes, open **Inventory → Data Catalog** to see the generated configuration for each collection.
Click the **Oracle** card.
* **Name** for the integration.
* **Connection String** in Easy Connect form, for example `user@host:1521/FREEPDB1`. For Autonomous Database, add `?wallet_location=...`.
* **Password**. Optional if the password is already in the connection string.
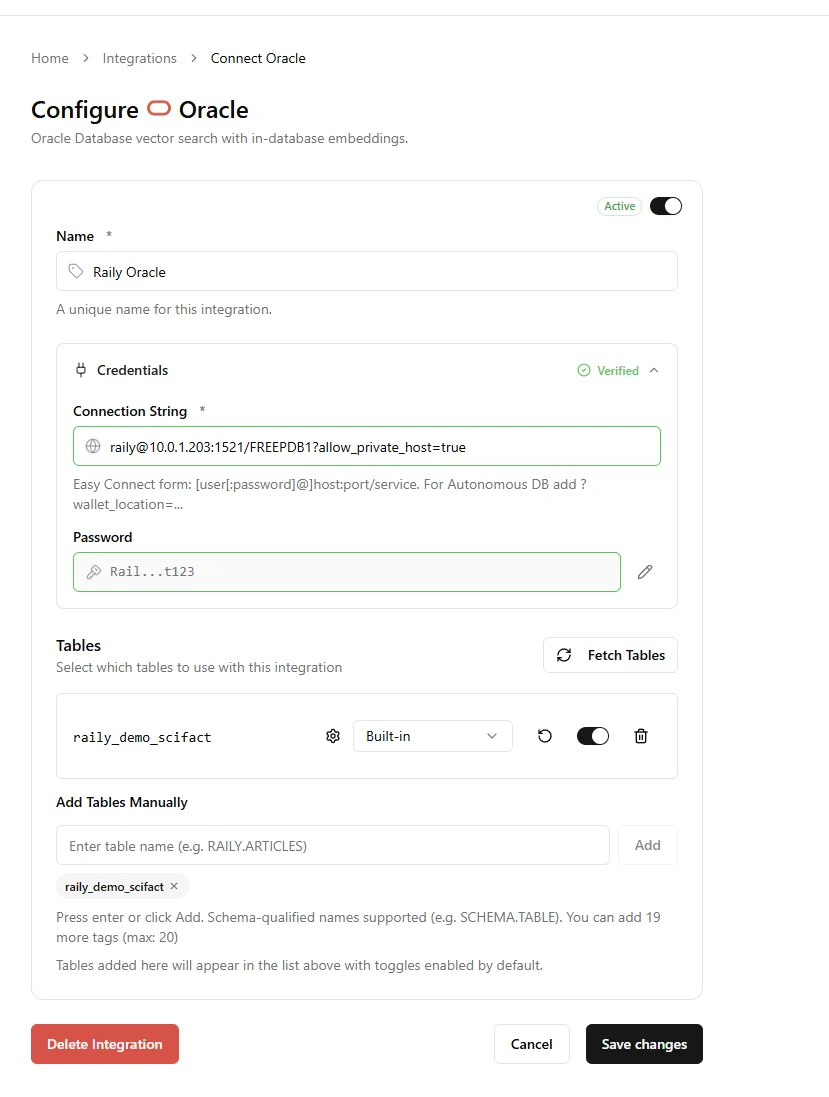 Raily checks the credentials automatically. The **Credentials** section shows **Verified** when they work, or **Failed** if not.
Click **Fetch Tables** and enable the ones you want, or add a table by name. Schema-qualified names are supported, for example `RAILY.ARTICLES`.
Pick an embedding config for each table. It must match the model that created the vectors. If embeddings are server-generated, set the config to **built-in**.
Don't have one yet? Open the embedding config picker and click **Create New**.
Enter a **Name**, pick a **Provider**, and set the **Model Name** and **Dimension** to match the model that created your vectors. Add an **API Key** if the provider needs one, then save.
Click **Create Integration**. Raily then configures agentic search for each collection automatically. This can take a few minutes, after which the integration appears under **My Integrations** with an **Active** status.
Once it finishes, open **Inventory → Data Catalog** to see the generated configuration for each collection.
After generation finishes, Raily opens the collection in **Data Catalog**.
Raily checks the credentials automatically. The **Credentials** section shows **Verified** when they work, or **Failed** if not.
Click **Fetch Tables** and enable the ones you want, or add a table by name. Schema-qualified names are supported, for example `RAILY.ARTICLES`.
Pick an embedding config for each table. It must match the model that created the vectors. If embeddings are server-generated, set the config to **built-in**.
Don't have one yet? Open the embedding config picker and click **Create New**.
Enter a **Name**, pick a **Provider**, and set the **Model Name** and **Dimension** to match the model that created your vectors. Add an **API Key** if the provider needs one, then save.
Click **Create Integration**. Raily then configures agentic search for each collection automatically. This can take a few minutes, after which the integration appears under **My Integrations** with an **Active** status.
Once it finishes, open **Inventory → Data Catalog** to see the generated configuration for each collection.
After generation finishes, Raily opens the collection in **Data Catalog**.
 Click the **IBM Ceph** card.
* **Name** for the integration.
* **RGW Endpoint URL** of the Ceph RADOS Gateway, for example `https://ceph.example.com`.
* **Region**. Required by the S3 client; Ceph ignores it. `us-east-1` is fine.
* **Object Bucket** where uploaded files are stored. Vectors live in `-vectors`.
* **Index Name**. Use `default` unless you have multiple indexes per bucket.
* **Access Key ID** and **Secret Access Key** for the Ceph cluster.
Click the **IBM Ceph** card.
* **Name** for the integration.
* **RGW Endpoint URL** of the Ceph RADOS Gateway, for example `https://ceph.example.com`.
* **Region**. Required by the S3 client; Ceph ignores it. `us-east-1` is fine.
* **Object Bucket** where uploaded files are stored. Vectors live in `-vectors`.
* **Index Name**. Use `default` unless you have multiple indexes per bucket.
* **Access Key ID** and **Secret Access Key** for the Ceph cluster.
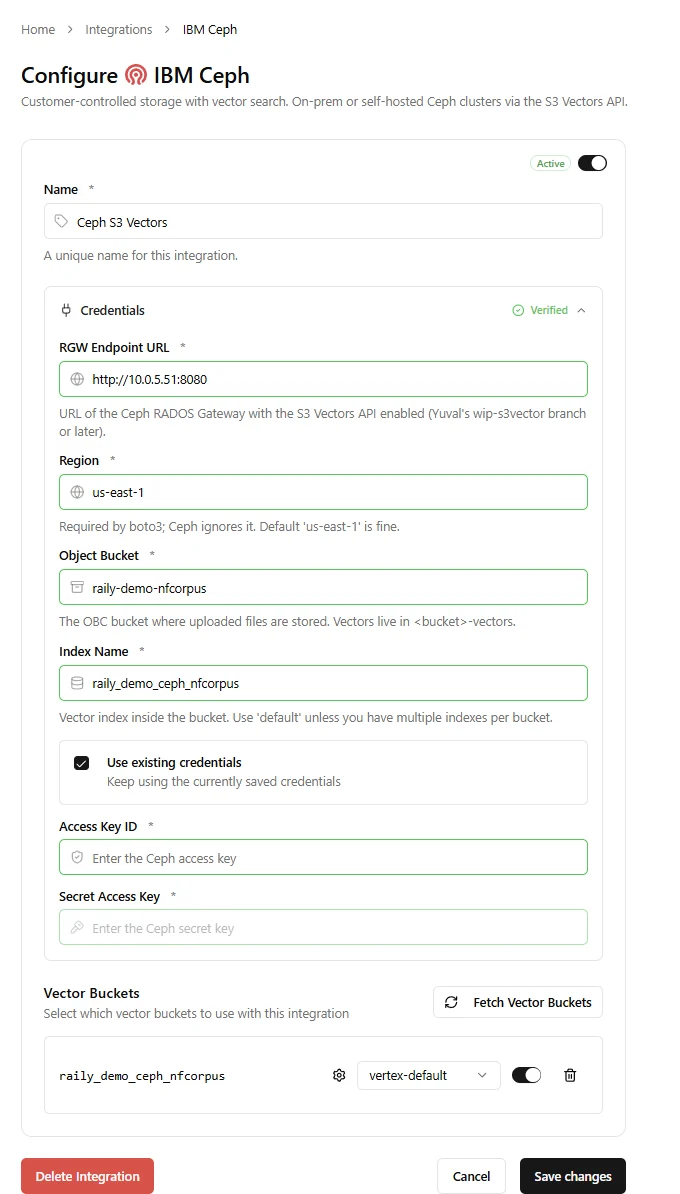 Click **Fetch Vector Buckets** and enable the ones you want.
Pick an embedding config for each vector bucket. It must match the model that created the vectors.
Don't have one yet? Open the embedding config picker and click **Create New**.
Enter a **Name**, pick a **Provider**, and set the **Model Name** and **Dimension** to match the model that created your vectors. Add an **API Key** if the provider needs one, then save.
Click **Create Integration**. Raily then configures agentic search for each collection automatically. This can take a few minutes, after which the integration appears under **My Integrations** with an **Active** status.
Once it finishes, open **Inventory → Data Catalog** to see the generated configuration for each collection.
After generation finishes, Raily opens the collection in **Data Catalog**.
Click **Fetch Vector Buckets** and enable the ones you want.
Pick an embedding config for each vector bucket. It must match the model that created the vectors.
Don't have one yet? Open the embedding config picker and click **Create New**.
Enter a **Name**, pick a **Provider**, and set the **Model Name** and **Dimension** to match the model that created your vectors. Add an **API Key** if the provider needs one, then save.
Click **Create Integration**. Raily then configures agentic search for each collection automatically. This can take a few minutes, after which the integration appears under **My Integrations** with an **Active** status.
Once it finishes, open **Inventory → Data Catalog** to see the generated configuration for each collection.
After generation finishes, Raily opens the collection in **Data Catalog**.
 Click the **Salesforce** card.
* **Name** for the integration.
* **Instance URL**, for example `https://myorg.my.salesforce.com`.
* **Client ID**, your Connected App consumer key.
* **Client Secret**, your Connected App consumer secret.
Click the **Salesforce** card.
* **Name** for the integration.
* **Instance URL**, for example `https://myorg.my.salesforce.com`.
* **Client ID**, your Connected App consumer key.
* **Client Secret**, your Connected App consumer secret.
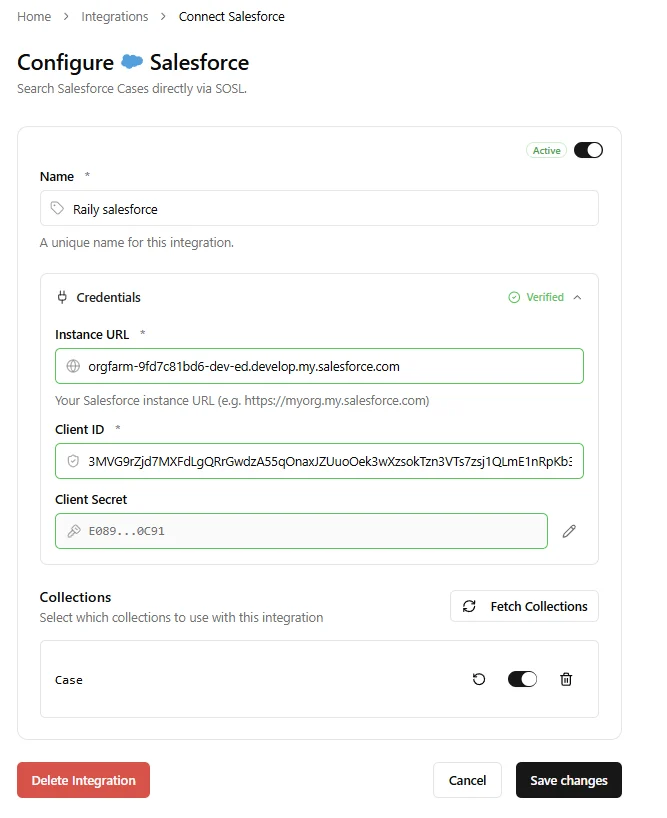 Raily checks the credentials automatically. The **Credentials** section shows **Verified** when they work, or **Failed** if not.
Click **Fetch Collections** and enable the ones you want. Salesforce search runs over Cases via SOSL, so no embedding config is needed.
Click **Create Integration**. Raily then configures agentic search for each collection automatically. This can take a few minutes, after which the integration appears under **My Integrations** with an **Active** status.
Once it finishes, open **Inventory → Data Catalog** to see the generated configuration for each collection.
After generation finishes, Raily opens the collection in **Data Catalog**.
Raily checks the credentials automatically. The **Credentials** section shows **Verified** when they work, or **Failed** if not.
Click **Fetch Collections** and enable the ones you want. Salesforce search runs over Cases via SOSL, so no embedding config is needed.
Click **Create Integration**. Raily then configures agentic search for each collection automatically. This can take a few minutes, after which the integration appears under **My Integrations** with an **Active** status.
Once it finishes, open **Inventory → Data Catalog** to see the generated configuration for each collection.
After generation finishes, Raily opens the collection in **Data Catalog**.
 Don't have a vector database yet? [Talk to us](https://www.raily.ai/contact) and we can provide one for you.
## Best practices
The embedding config must match the model that created the vectors.
Index the fields people filter by so the agent can use them.
Re-embed when content changes so search stays accurate.
Apply policies so each endpoint exposes only what it should.
Don't have a vector database yet? [Talk to us](https://www.raily.ai/contact) and we can provide one for you.
## Best practices
The embedding config must match the model that created the vectors.
Index the fields people filter by so the agent can use them.
Re-embed when content changes so search stays accurate.
Apply policies so each endpoint exposes only what it should.