> ## Documentation Index
> Fetch the complete documentation index at: https://docs.raily.ai/llms.txt
> Use this file to discover all available pages before exploring further.
# AI Endpoints
> Expose your data collections in a trusted, authenticated, and transparent way to AI agents and applications
## Overview
AI Endpoints let you expose your data collections to AI agents and applications in a trusted, authenticated, and transparent way. Each AI Endpoint is configured with specific authentication and data settings.
 ## What is an AI Endpoint?
An AI Endpoint is configured with:
* **Authentication** - Specific Identity Provider (IDP) for secure access
* **Data Integration** - Specific data collection or integration you choose to expose
* **Full Analytics** - Complete monitoring including latency, calls, and usage metrics
Raily manages these endpoints and provides comprehensive analytics on their usage.
## How AI Endpoints Work
Each AI Endpoint:
1. **Authenticates requests** via your configured IDP
2. **Serves data** from your chosen data collection or integration
3. **Tracks all activity** with detailed analytics
4. **Enforces access policies** based on your configuration
## Create or attach an endpoint
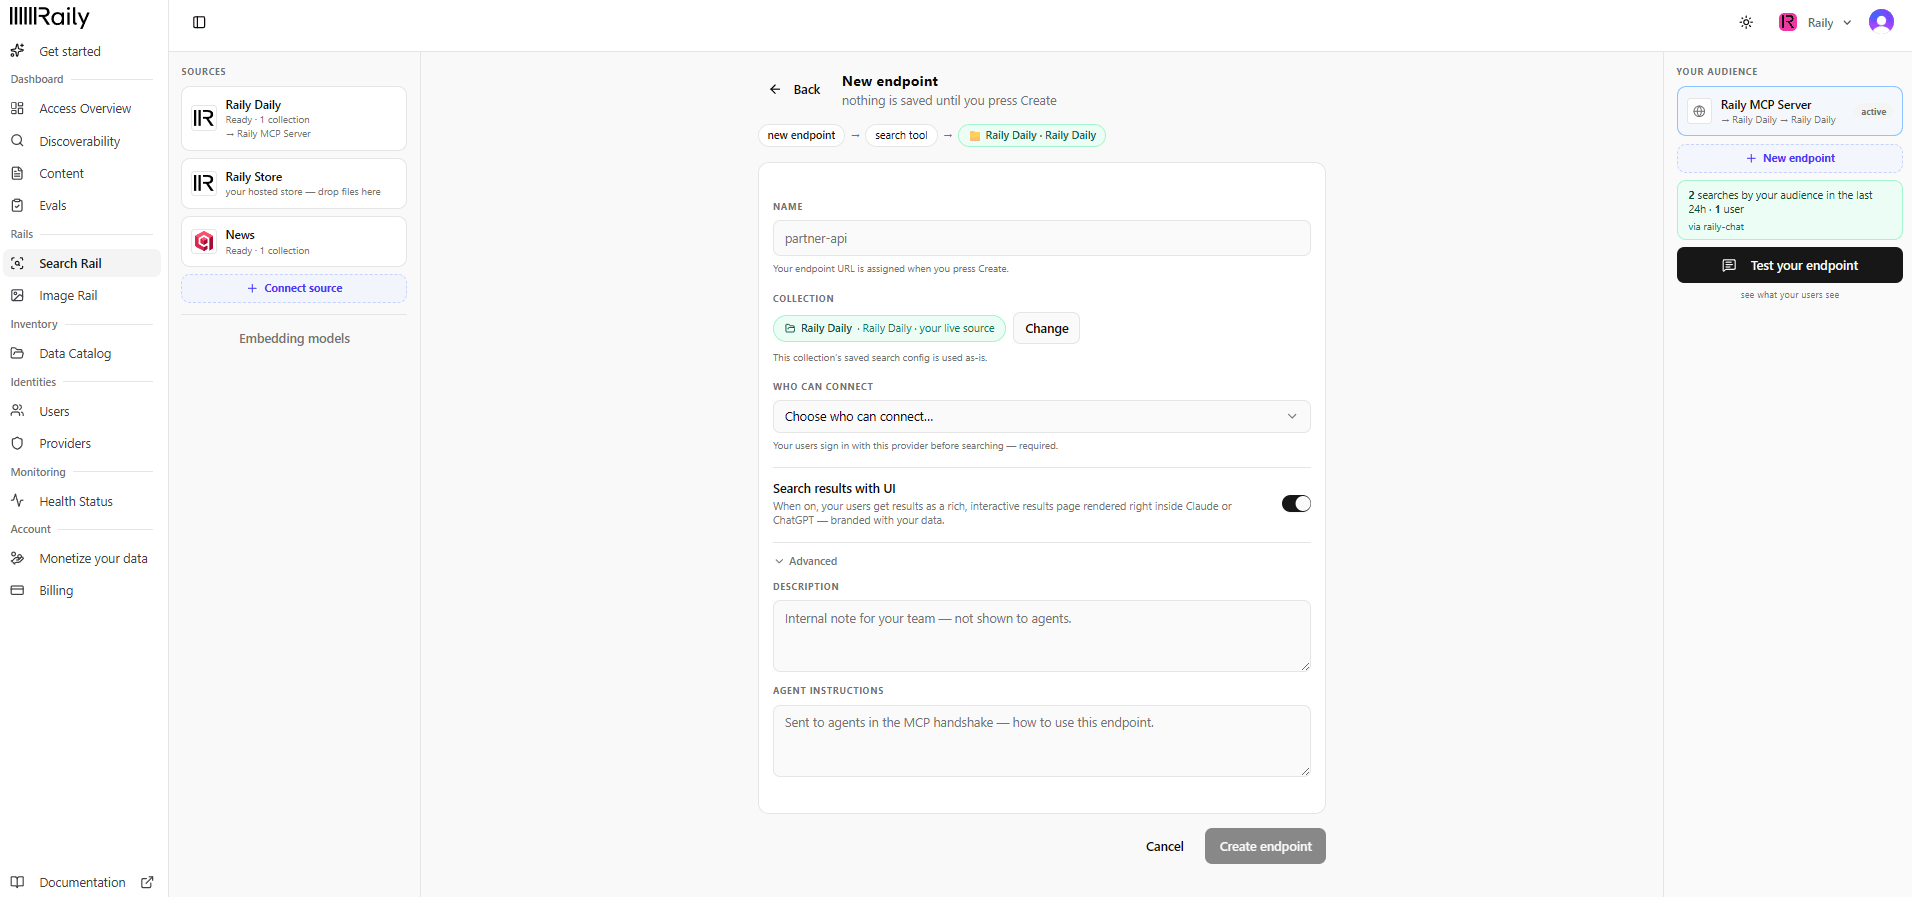
Your endpoints live in the **Your audience** panel on the right of **Search Rail**. Each one shows the collection it serves and whether it's active. Click **+ New endpoint** to add one.
You can also attach an endpoint while looking at a collection: find the **Searched by** row and click **add endpoint**, then either point an existing endpoint here or create a new one.
In trial mode, Raily has already created one endpoint for you. You can't add a second, but you can point it at any collection you connect.
Clicking **+ New endpoint** opens the **New endpoint** form shown above. Nothing is saved until you click **Create endpoint**.
Type a **Name** your audience recognizes (for example `partner-api`). Raily assigns the endpoint URL when you click **Create endpoint**.
The **Collection** is the source you started from, and its saved search config is used as-is. Click **Change** to point at a different one.
Pick a [sign-in provider](/concepts/identities-and-auth) under **Who can connect**. Your users sign in with it before searching. This is required; there is no open, no-auth option.
Leave **Search results with UI** on and your users get a rich, interactive results page inside Claude or ChatGPT, branded with your data. Turn it off for plain text. More in [Search with UI](#search-with-ui) below.
Open **Advanced** for a **Description** (an internal note for your team, never shown to agents) and **Agent instructions** (sent to agents in the MCP handshake to tell them how to use this endpoint).
Click **Create endpoint**. The endpoint goes live and inherits the collection's search config, so there is nothing to regenerate.
## Search with UI
**Search with UI** controls how this endpoint presents results in the connected AI client. Turn it on and the endpoint returns an interactive visual dashboard that the client renders in the chat: the MCP UI in clients like Claude, or the app UI in ChatGPT. Turn it off and the same results come back as plain text, which every client can read.
## What is an AI Endpoint?
An AI Endpoint is configured with:
* **Authentication** - Specific Identity Provider (IDP) for secure access
* **Data Integration** - Specific data collection or integration you choose to expose
* **Full Analytics** - Complete monitoring including latency, calls, and usage metrics
Raily manages these endpoints and provides comprehensive analytics on their usage.
## How AI Endpoints Work
Each AI Endpoint:
1. **Authenticates requests** via your configured IDP
2. **Serves data** from your chosen data collection or integration
3. **Tracks all activity** with detailed analytics
4. **Enforces access policies** based on your configuration
## Create or attach an endpoint
Your endpoints live in the **Your audience** panel on the right of **Search Rail**. Each one shows the collection it serves and whether it's active. Click **+ New endpoint** to add one.
You can also attach an endpoint while looking at a collection: find the **Searched by** row and click **add endpoint**, then either point an existing endpoint here or create a new one.
In trial mode, Raily has already created one endpoint for you. You can't add a second, but you can point it at any collection you connect.
Clicking **+ New endpoint** opens the **New endpoint** form shown above. Nothing is saved until you click **Create endpoint**.
Type a **Name** your audience recognizes (for example `partner-api`). Raily assigns the endpoint URL when you click **Create endpoint**.
The **Collection** is the source you started from, and its saved search config is used as-is. Click **Change** to point at a different one.
Pick a [sign-in provider](/concepts/identities-and-auth) under **Who can connect**. Your users sign in with it before searching. This is required; there is no open, no-auth option.
Leave **Search results with UI** on and your users get a rich, interactive results page inside Claude or ChatGPT, branded with your data. Turn it off for plain text. More in [Search with UI](#search-with-ui) below.
Open **Advanced** for a **Description** (an internal note for your team, never shown to agents) and **Agent instructions** (sent to agents in the MCP handshake to tell them how to use this endpoint).
Click **Create endpoint**. The endpoint goes live and inherits the collection's search config, so there is nothing to regenerate.
## Search with UI
**Search with UI** controls how this endpoint presents results in the connected AI client. Turn it on and the endpoint returns an interactive visual dashboard that the client renders in the chat: the MCP UI in clients like Claude, or the app UI in ChatGPT. Turn it off and the same results come back as plain text, which every client can read.
 With it on, a reader can scan, filter, and open results visually without leaving the chat. The fields shown in the dashboard come from your [Data Catalog](/integrations/data-catalog).
## Endpoint Configuration
An AI Endpoint is configured with:
### Identity Provider (IDP)
Connect the AI Endpoint to a specific IDP for authentication:
* OAuth providers
* API key authentication
* Custom authentication systems
* White-label authentication
### Data Collection
Choose which data collection or integration the endpoint exposes:
* Specific content collections
* Vector store data
* External data integrations
* Storage buckets
## Analytics
Raily provides full analytics for each AI Endpoint, including:
* **Total Calls** - Number of requests to the endpoint
* **Average Response Time** - Latency metrics
* **Total Input Tokens** - Tokens sent in requests
* **Total Output Tokens** - Tokens returned in responses
* **Average Input/Output Tokens** - Per-request averages
* **Access patterns over time** - Timeline of usage
Access analytics through the Raily dashboard at [app.raily.ai/dashboard](https://app.raily.ai/dashboard).
## AI Endpoint Types
Endpoints for autonomous AI agents
Endpoints for AI-powered applications
Endpoints for LLM provider access
Endpoints for custom integrations
## Trusted and Transparent
AI Endpoints provide:
* **Trust** - Authentication on every request
* **Transparency** - Full visibility into who accesses what
* **Control** - Configure exactly what data is exposed
* **Analytics** - Detailed metrics on all usage
## Best Practices
Create separate AI Endpoints for different use cases and environments
Regularly review endpoint analytics to understand usage patterns
Use robust IDP configuration for endpoint authentication
Configure appropriate access policies for each endpoint
## Next Steps
Add a sign-in provider for your endpoints
View endpoint analytics and metrics
With it on, a reader can scan, filter, and open results visually without leaving the chat. The fields shown in the dashboard come from your [Data Catalog](/integrations/data-catalog).
## Endpoint Configuration
An AI Endpoint is configured with:
### Identity Provider (IDP)
Connect the AI Endpoint to a specific IDP for authentication:
* OAuth providers
* API key authentication
* Custom authentication systems
* White-label authentication
### Data Collection
Choose which data collection or integration the endpoint exposes:
* Specific content collections
* Vector store data
* External data integrations
* Storage buckets
## Analytics
Raily provides full analytics for each AI Endpoint, including:
* **Total Calls** - Number of requests to the endpoint
* **Average Response Time** - Latency metrics
* **Total Input Tokens** - Tokens sent in requests
* **Total Output Tokens** - Tokens returned in responses
* **Average Input/Output Tokens** - Per-request averages
* **Access patterns over time** - Timeline of usage
Access analytics through the Raily dashboard at [app.raily.ai/dashboard](https://app.raily.ai/dashboard).
## AI Endpoint Types
Endpoints for autonomous AI agents
Endpoints for AI-powered applications
Endpoints for LLM provider access
Endpoints for custom integrations
## Trusted and Transparent
AI Endpoints provide:
* **Trust** - Authentication on every request
* **Transparency** - Full visibility into who accesses what
* **Control** - Configure exactly what data is exposed
* **Analytics** - Detailed metrics on all usage
## Best Practices
Create separate AI Endpoints for different use cases and environments
Regularly review endpoint analytics to understand usage patterns
Use robust IDP configuration for endpoint authentication
Configure appropriate access policies for each endpoint
## Next Steps
Add a sign-in provider for your endpoints
View endpoint analytics and metrics